Versions Compared

Key

  • This line was added.
  • This line was removed.
  • Formatting was changed.

...

Sv translation
languageen

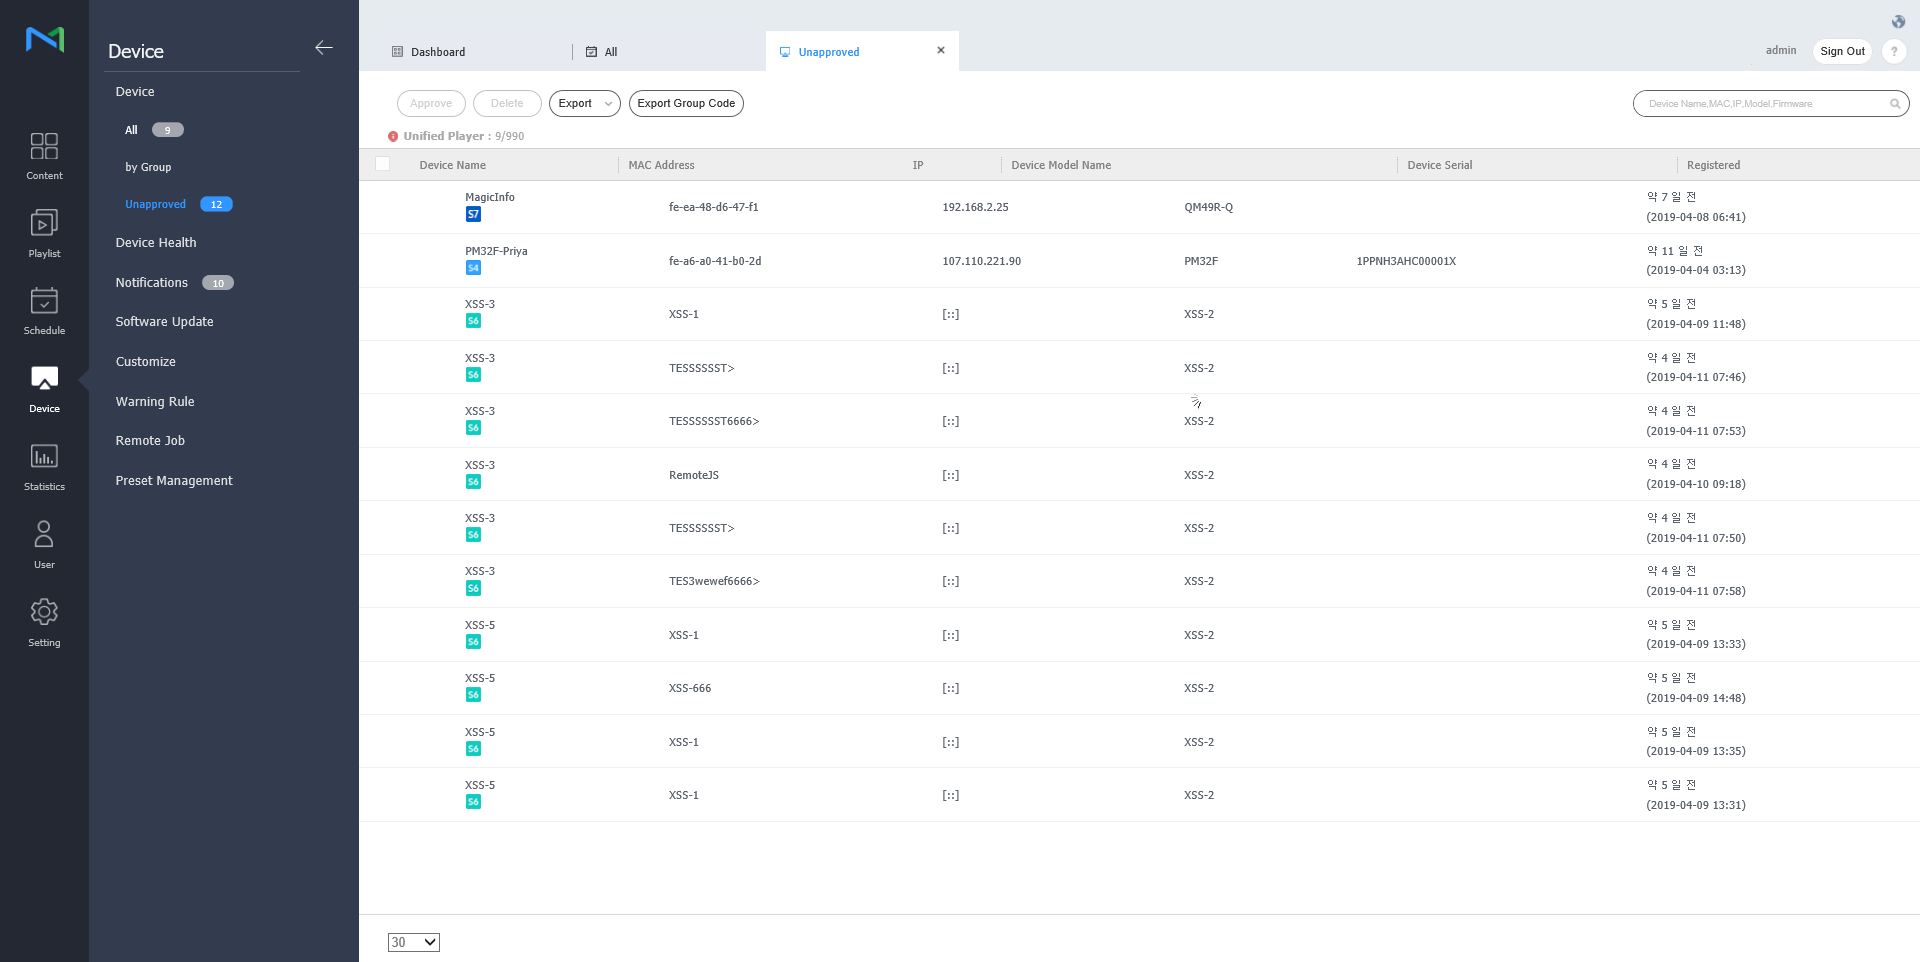
View devices connected to MagicInfo Server, retrieve details for each device, and remotely control devices. Create groups for each organization to manage devices by the group. For each organization, a default group is created by default.

Click Device from the sub-menu items.

  • All: View all devices connected to MagicInfo Server, retrieve details for each device, and remotely control devices.
  • by Group: View devices connected to MagicInfo Server by the group.
  • Unapproved: View and authorize devices that are connected to MagicInfo Server but not authorized.
Info
titleNote
  • If VideoWall devices are connected to MagicInfo Server, click the appropriate menu item view details for each device.
  • With Device Permissions enabled, the device manager can only manage devices authorized by general administrator or organization administrators. For details on device management privilege settings, refer to ► 사용자 정보 관리하기
Stylesheet
classscreen
1
  • Edit: Edit information on the selected device. For details, refer to ► 장치 정보 수정하기
  • Delete: Delete the selected device.
  • Move: Move the selected device. Select a group from the "move group" window.
  • Quick Control: View a list of frequently used remote control functions. For details, refer to ► Quick Control
  • Assign Tag: Assign media or variable tags to devices. For details, refer to ► Assigning tags to devices
  • Export: Export a list of devices as an Excel or PDF file.
2View a description of icons displayed on the device list.
3

Filter the device list to view specific devices only. Select a condition from the filter settings window and click Save.

Info
titleNote

If you select Device Type, only devices that currently have licenses registered to MagicInfo Server appear.

4

Change the view mode for the device list.

  • : Display devices as thumbnail images.
  • : Display device names and information in the device list.
5Configure device polling settings.
6Search devices by using keywords.
7

Select info items to display in thumbnails. This option appears only when the device view mode is set to thumbnail mode.

8Adjust the size of thumbnails. This option appears only when the device view mode is set to thumbnail mode.
9

Display the device list in alphabetical or reverse alphabetical order. This option appears only when the device view mode is set to thumbnail mode.

10

View the list of devices.

  • If thumbnail view mode is in use, click a thumbnail to select a device. To view device details, click a device name.

    Info
    titleNote

    When LED device is connected, click on from thumbnail to manage corresponding LED. For details, refer to ►Manage LED device

  • If list view mode is in use, select a checkbox to select a device. To view device details, click a device name.

Authorizing devices


View and authorize devices that are connected to MagicInfo Server but not authorized.

  1. Click Device > Unapproved. Unapproved devices appear.

    Stylesheet
    classscreen
  2. Select a device and click Approve. A window appears where a device can be authorized.
  3. Specify the name, group, location and expiration date. Click OK. The device has been authorized.

    Stylesheet
    classscreen
Info
titleNote
  • To delete an unauthorized device without authorizing it, select the device and click Delete.
  • To approve multiple devices of the same model simultaneously, select the device checkboxes and click Approve. If you enter representative names of devices, the device names are saved in the "representative name_(sequence number)" format.

Managing device groups


  1. Click by Group.
  2. Manage groups, using one of the following options:
    • Option 1: Select a group and right-click on the mouse.
    • Option 2: Place the mouse cursor on a group name and click .
    Stylesheet
    classscreen
    New Group

    Create a sub-group under the selected group.

    Info
    titleNote

    A root group can be created by adding an organization. For details on adding organizations, refer to ► 소속 관리하기

    Rename

    Rename the selected group.

    Info
    titleNote

    It is not possible to rename a root group.

    Delete

    Delete the selected group.

    Info
    titleNote

    It is not possible to delete a root group.


Info
titleNote
  • To move a group, drag the group from by Group to a desired location. Sub-groups can be moved to root groups. It is not possible to move root groups to sub-groups. When moving a group that contains sub-groups, all the sub-groups will move together maintaining the group hierarchy.
  • The number of users in a group will be displayed next to the group name.

Anchor
managing_led_devices
Manage LED device


You can check for the information of LED device that is connected to MagicInfo Server or manage the cabinet that is connected to LED. 

Click on from device list. A list of cabinet that is connected to LED device is displayed.

Stylesheet
classscreen
1
  • Edit: You can modify the cabinet you have selected. 
  • Scan Cabinet: You can search for the cabinet that is connected to LED device. Set the desired number for each group and click on Scan.

  • Show ID: ID value can be displayed on the cabinet you have selected.

  • Hide ID: ID value can be hidden from the cabinet you have selected.
  • Edit Layout: Configure Cabinet layouts. For details, refer to ► Setting_Cabinet_Layout
  • Warning Rule: Cabinets with predefined errors will be indicated in red color. For details, refer to ► 경고 룰 설정하기
  • Export: Export a list of devices as an Excel or PDF file.
2

Change the view mode for the cabinet list.

  • : Display canbiets as thumbnail images.
  • : Display cabinet names and information in the cabinet list.
3You can update the cabinet list.
4A list of cabinet that is connected is displayed.

Modify LED information

  1. Select the cabinet you wish from cabinet list and click on Edit.
  2. View and edit information and click Save.
    To refresh the current device status, click Current Status.

    Stylesheet
    classscreen

    Cabinet Settings

    1. ABL: If the video or image that is being displayed is too bright, it may cause eye strain after long periods of time. In this case, you can set to automatically adjust the brightness. In order to use the function, click ON. In order to deactivate, click OFF.
    2. Gamut: You can change the input source for the cabinet. Select the source you desire from a drop down box.
    3. Backlight: You can adjust the brightness of cabinet at a desired level (0 ~ 10 levels).

    Cabinet Calibration

    You can calibrate the resolution of cabinet that is connected to S-box. In order to use the function, click ON. In order to deactivate, click OFF.

    1. Pixel RGB CC: You can apply pixel RGB CC adjustment value as cabinet resolution.
    2. Module RGB CC: You can apply module RGB CC adjustment value as cabinet resolution.
    3. Edge Correction: You can apply border adjustment value as cabinet resolution.

Search cabinet

You can search for the cabinet that is connected to LED device.

  1. Select the cabinet you wish from the cabinet list and click on Scan Cabinet.
  2. Set the desired number for each group and click on Scan.

    Stylesheet
    classscreen

Anchor
Setting_Cabinet_Layout
Configuring cabinet layouts

Use this to configure the layout of Cabinets that are connected to the LED device.

  1. Click Edit Layout in the cabinet list.

    • LED Layout Manager will launch.
  2. Select from the cabinet groups that belong to the device and click Auto Align.

    Stylesheet
    classscreen

    Viewport
    Review the Viewport resolution and the number of cabinets that are connected to the LED device, along with their position.
    Cabinet Group

    Search and select from the list of cabinet groups that are connected to the LED device.

    Info
    titleNote

    After selecting the group, you can adjust the position of individual cabinets in that group.


  3. Select a layout file and click 02.
    • Click  to apply a test pattern to the cabinet.
    Stylesheet
    classscreen

  4. Adjust the cabinet position and click 03.

    Stylesheet
    classscreen

    1
    • Image Modified: Undo the last command to revert back to the previous state.
    • Image Modified: Redo a command that has been undone.
    • Image Modified: Align several cabinets based on desired alignment criteria.
    • Image Modified: Automatically arrange cabinets to fit the grid.
    • Image Modified: Display the ruler.
    • Image Modified: Display the guides.
    • Image Modified: Select the test pattern to use on the cabinet.
    • Image Modified: Preview the cabinet with the layout applied.
    2

    Zoom in or out the editor screen view. Use the slide bar to adjust the zoom level.

    3
    • Image Modified: Adjust the aspect ratio and position of the editor to fit the window for an overview of cabinets.
    • Image Modified: Move the selected cabinet.
    4You can review the Layout Manager version and the open source license information.


  5. After editing the layout, click Yes.

    • The cabinet layout will be saved to the server.

Anchor
using_quick_control
using_quick_control
Quick Control


Quick Control is the collection of frequently used remote device control functions.

To use Quick Control dashboard, select a device from the list and click Quick Control.

Stylesheet
classscreen
PowerTurn the device on or off.
Panel StatusSwitch the device panel on or off.
Remote Control

Enable the remote access function.

The remote access function is only available in MagicInfo Player I.

RestartRestart the device.
SourceSelect an input source from the dropdown list.
Schedule ChannelChange the device channel.
VolumeAdjust the volume of the device.
MuteMute or unmute the device.
Empty StorageEmpty the storage in a device.

Anchor
setting_tags_on_devices
Assigning media tags to devices


Assign a tag to a device. This allows the device to selectively display information that satisfies conditions of the tag assigned to a DLK element or playlist.

  1. Select a device the checkbox next to devices from the device list and click and click Assign Tag > Media Tag. It is possible to select more than one device.

    Stylesheet
    classscreen
    Image Modified
  2. Use the media tag settings window to configure tag settings media tags and click click Save.

    Stylesheet
    classscreen
2
1
Tags are displayed as a list.
  1. Select and drag a tag to a device.
  2. To add or delete tags, click Edit.

View the list of devices.

  1. Add a media tag to individual devices.

  2. Click Image Added to remove a device from the list.

2View the list of media tags.
    • Select the checkbox next to media tags you want to assign.
3
  • Add tag: Add media tags.
  • Add: Assign selected media tags to devices.
  • Cancel: Close the media tag settings window.


Info
titleNote

To assign a tag to a device, first make sure to add the tag to Premium Server. For details on adding or editing tags, refer to ► 태그 관리하기

Anchor
Setting_variable_tags_on_devices
Assigning variable tags to devices


Assign variable tags to devices. This allows you to replace other tag values with content-specific variable tags.

  1. Select the checkbox next to devices from the list and and click Assign Tag > Variable Tag. It is possible to select more than one device.
  2. Use the tag settings window to configure variable tags and click Save.

    Stylesheet
    classscreen

    Image Added

    1

    View the list of devices.
    Add a variable tag to

    each device.To delete a tag, click Image Removed

    individual devices.
    Click Image Added to remove a device from the list.

    2

    View the list of variable tags.
    Select the checkbox next to variable tags you want to assign.
    To add or delete variable tags, click Edit.

    3
    Save: Save tag settings
    • Add tag: Add variable tags.

    Close:
    • Add: Assign selected variable tags to devices.

    • Cancel: Close the variable tag settings window.


Info
titleNote

To assign a tag to a device, first make sure to add the variable tag to

MagicInfo

Premium Server. For details on adding or editing tags, refer to ► 태그 관리하기

Sv translation
languageit

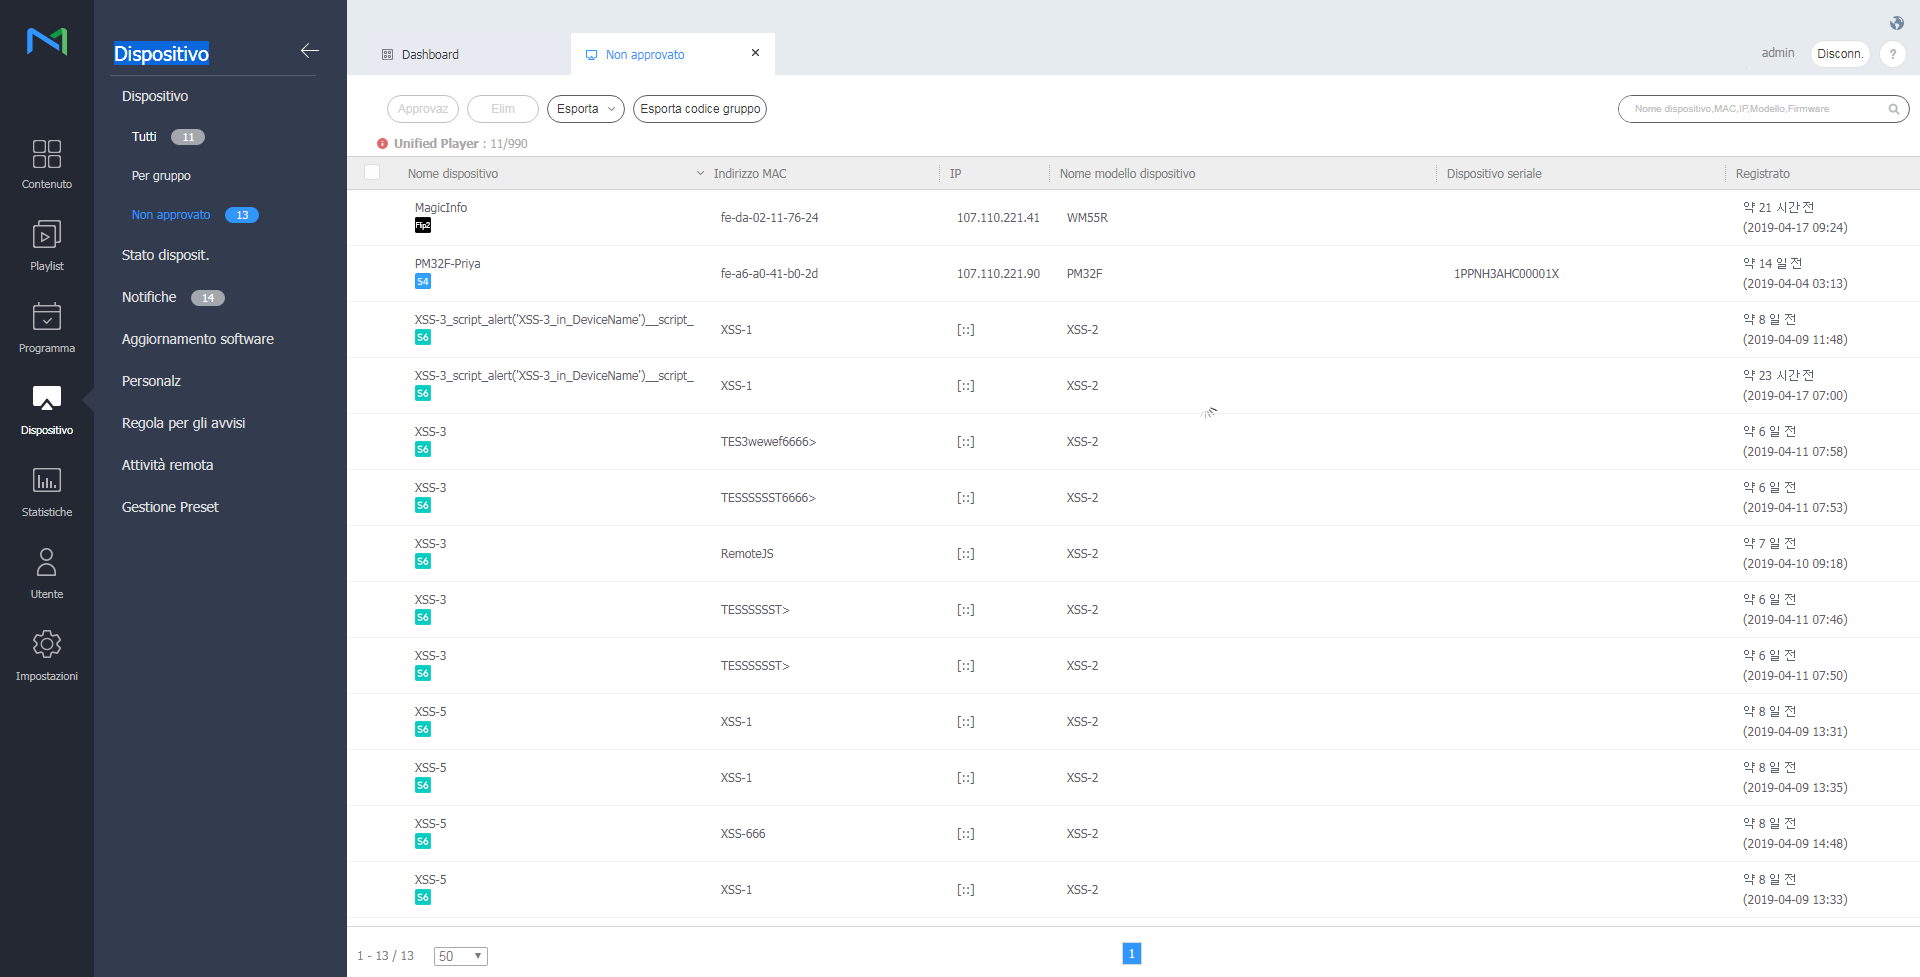
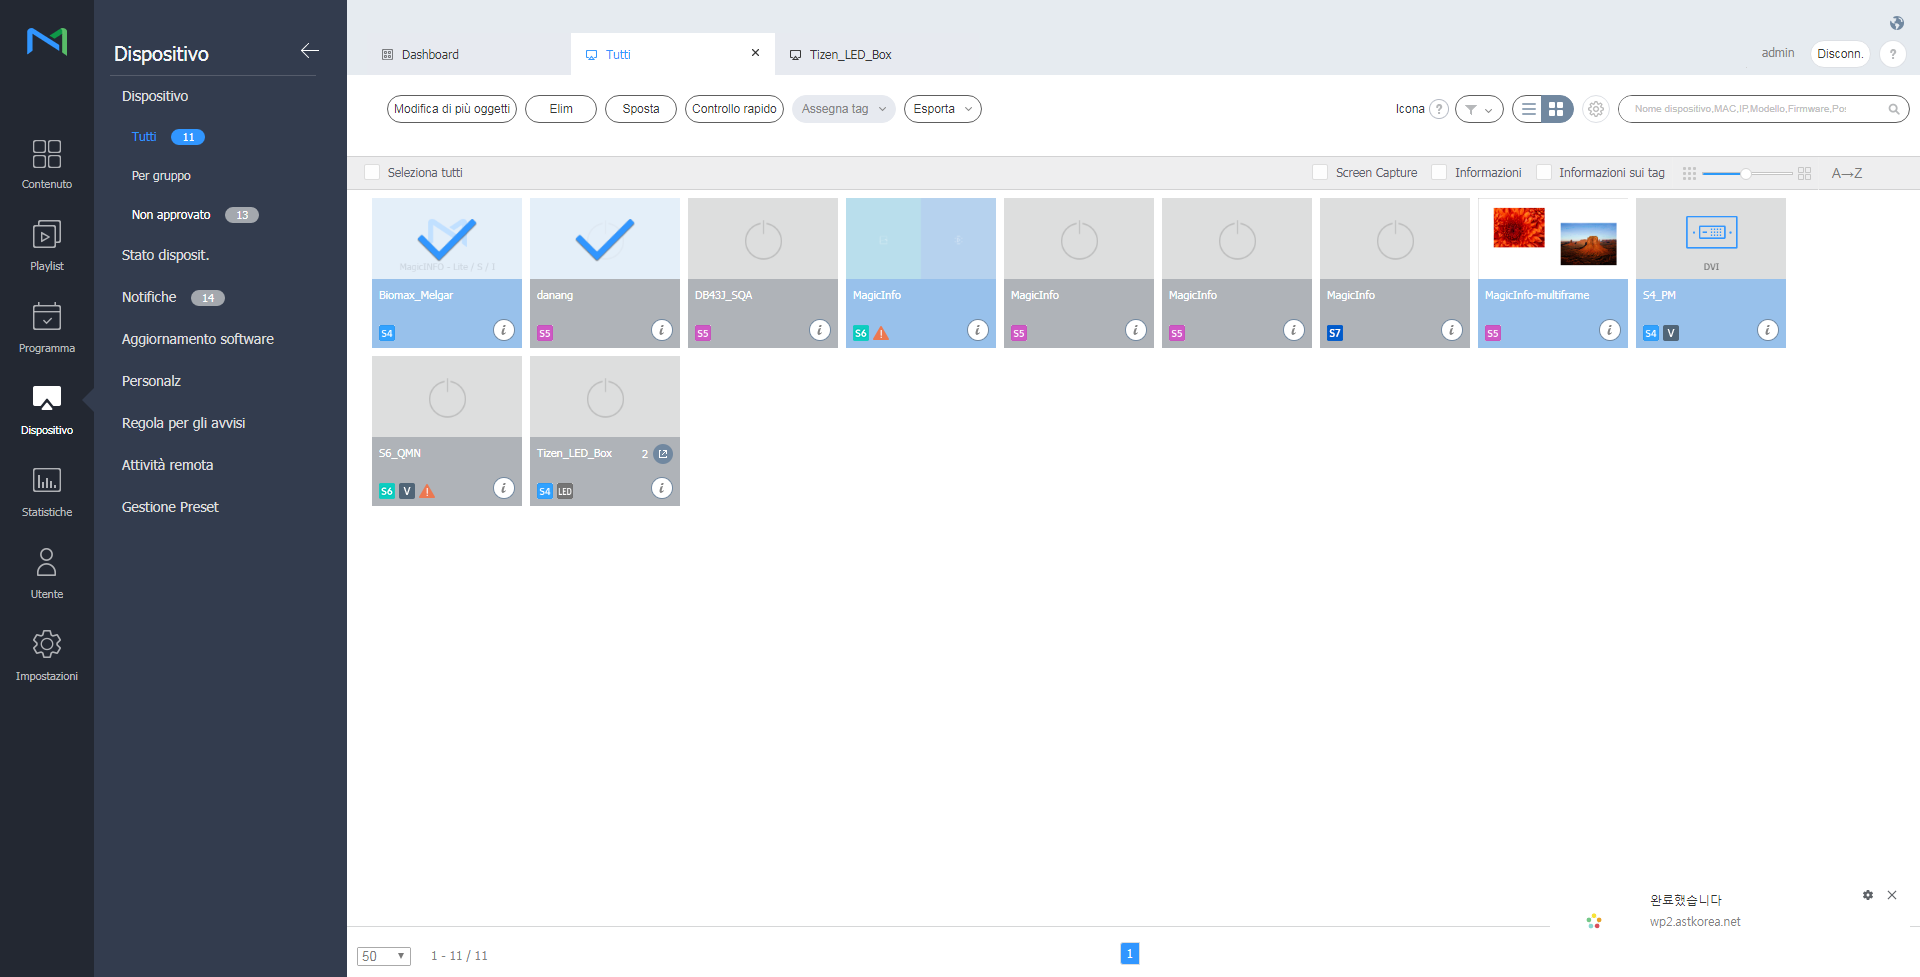
È possibile visualizzare i dispositivi connessi a MagicInfo Server, recuperare i dettagli relativi a ciascun dispositivo e monitorare/controllare in remoto i dispositivi. È inoltre possibile creare gruppi per ciascuna organizzazione al fine di gestire i dispositivi per gruppo. In ciascuna organizzazione, per impostazione predefinita viene creato un gruppo di default.

Cliccare su Dispositivo nel sottomenu.
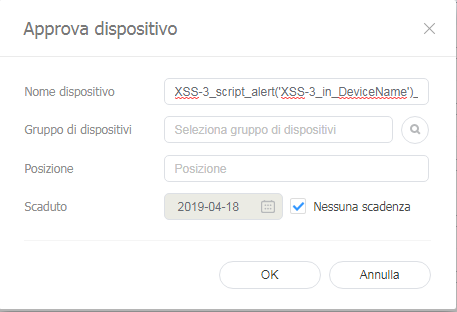
  • Tutte: consente di visualizzare tutti i dispositivi connessi a MagicInfo Server, recuperare i dettagli relativi a ciascun dispositivo e monitorare/controllare in remoto i dispositivi.
  • Per gruppo: consente di visualizzare i dispositivi connessi a MagicInfo Server per gruppo.
  • Non approvato: È possibile visualizzare e autorizzare i dispositivi che sono connessi a MagicInfo Server ma non autorizzati.
Info
titleNota
  • Se un dispositivo VideoWall è connesso a MagicInfo Server, è possibile cliccare su ciascun menu per visualizzare i dettagli relativi a ciascun dispositivo.
  • Se i Permessi dispositivo sono abilitati, il gestore dei dispositivi può gestire solamente i dispositivi autorizzati dall'amministratore generale o dagli amministratori dell'organizzazione. Per informazioni sulle impostazioni relative ai privilegi di gestione dispositivi, vedere quanto segue: ► 사용자 정보 관리하기
Stylesheet
classscreen
1
  • Modif: consente di modificare le informazioni relative ai dispositivi selezionati. Per i dettagli, vedere ► 장치 정보 수정하기
  • Elim: consente di eliminare il dispositivo selezionato.
  • Sposta: consente di spostare il dispositivo selezionato. Selezionare un gruppo dalla finestra di "spostamento gruppo".
  • Controllo rapido: consente di visualizzare un elenco di funzioni telecomando utilizzate di frequente. Per i dettagli, vedere ► using_quick_control
  • Assegna tag: consente di assegnare tag ai dispositivi. Per i dettagli, vedere ► setting_tags_on_devices
  • Esporta: L'elenco dei dispositivi viene esportato in formato Excel o PDF.
2Consente di visualizzare una descrizione delle icone mostrate nell'elenco dei dispositivi.
3

Consente di filtrare l'elenco dei dispositivi per visualizzare solamente dispositivi specifici. Selezionare una condizione dalla finestra delle impostazioni di filtro e cliccare su Salva.

Info
titleNota

Il filtro Tipo dispositivo consente di visualizzare solamente i dispositivi attualmente in possesso di licenze registrate su MagicInfo Server.

4

Consente di modificare la modalità di visualizzazione dell'elenco dei dispositivi.

  • : consente di visualizzare l'elenco dei dispositivi sotto forma di anteprime.
  • : consente di visualizzare l'elenco dei dispositivi con i nomi e le informazioni dei dispositivi.
5Consente di configurare il polling dispositivo.
6Consente di cercare dispositivi con parole chiave del dispositivo.
7

Consente di selezionare le informazioni da visualizzare nelle miniature. Questa opzione viene visualizzata solo quando la modalità di visualizzazione del dispositivo è impostata sulle miniature.

8Consente di regolare le dimensioni delle miniature. Questa opzione viene visualizzata solo quando la modalità di visualizzazione del dispositivo è impostata sulle miniature.
9

Consente di visualizzare l'elenco dei dispositivi in ordine alfabetico A-Z o Z-A. Questa opzione viene visualizzata solo quando la modalità di visualizzazione del dispositivo è impostata sulle miniature.

10

Consente di visualizzare l'elenco dei dispositivi.

  • Se si sta utilizzando la modalità di visualizzazione miniature, cliccare su una miniatura per selezionare un dispositivo. Per visualizzare i dettagli di un dispositivo, cliccare sul relativo nome.

    Info
    titleNota

    Quando si collega il dispositivo LED, cliccare dall'anteprima per gestire il LED corrispondente. Per i dettagli, vedere ►Gestisci dispositivo LED

  • Se si sta utilizzando la modalità di visualizzazione elenco, selezionare una casella di controllo per scegliere un dispositivo. Per visualizzare i dettagli di un dispositivo, cliccare sul relativo nome.

Autorizzazione di dispositivi


È possibile visualizzare e autorizzare i dispositivi che sono connessi a MagicInfo Server ma non autorizzati.

  1. Cliccare su Dispositivo > Non approvato. Vengono visualizzati i dispositivi non approvati.

    Stylesheet
    classscreen
  2. Selezionare un dispositivo e cliccare su Approvaz. Viene visualizzata una finestra nella quale è possibile autorizzare un dispositivo.
  3. Specificare nome, gruppo, posizione e data di scadenza. Cliccare su OK. Il dispositivo è stato autorizzato.

    Stylesheet
    classscreen
Info
titleNota
  • Per eliminare un dispositivo non autorizzato senza autorizzarlo, selezionarlo e cliccare su Elim.
  • Per approvare più dispositivi dello stesso modello al contempo, selezionare le caselle di controllo dei dispositivi e cliccare su 승인. Se si immettono i nomi rappresentativi dei dispositivi, tali nomi vengono salvati in formato "nome rappresentativo_(numero progressivo)".

Gestione dei gruppi di dispositivi


  1. Cliccare su Per gruppo.
  2. Gestire i gruppi dispositivi utilizzando una delle opzioni seguenti:
    • Opzione 1: Selezionare un gruppo e cliccarvi sopra con il pulsante destro del mouse.
    • Opzione 2: Posizionare il cursore del mouse sul nome di un gruppo e cliccare su .
    Stylesheet
    classscreen
    Nuovo gruppo

    Consente di creare un sottogruppo nel gruppo selezionato.

    Info
    titleNota

    È possibile creare un gruppo principale aggiungendo un'organizzazione. Per i dettagli sull'aggiunta di organizzazioni, vedere ► 소속 관리하기

    Rinomina

    Rinomina il gruppo selezionato.

    Info
    titleNota

    Non è possibile rinominare un gruppo principale.

    Elim

    Elimina il gruppo selezionato.

    Info
    titleNota

    Non è possibile eliminare un gruppo principale.


Info
titleNota
  • Per spostare un gruppo, trascinare il gruppo da Per gruppo in un gruppo desiderato. È possibile spostare i sottogruppi nei gruppi principali. Non è possibile spostare i gruppi principali nei sottogruppi. Lo spostamento di un gruppo contenente sottogruppi determina lo spostamento di tutti i sottogruppi contemporaneamente mantenendo la struttura gerarchica del gruppo.
  • Il numero di utenti appartenenti a un gruppo viene visualizzato accanto al nome del gruppo.

Anchor
managing_led_devices
Gestire un dispositivo LED


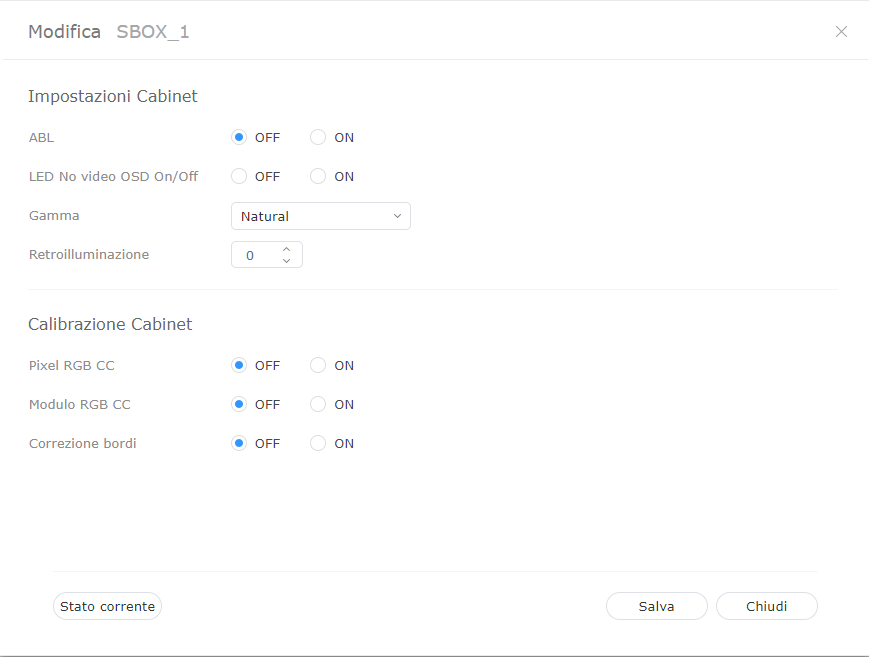
È possibile verificare le informazioni del dispositivo LED collegato a MagicInfo Server o gestire il case collegato al LED. 

Cliccare dall'elenco dei dispositivi. Si visualizza un elenco del case collegato al dispositivo LED.

Stylesheet
classscreen
1
  • Modif: È possibile modificare il case selezionato. 
  • Esegui scansione Cabinet: È possibile cercare il case collegato al dispositivo LED. Impostare il numero desiderato per ciascun gruppo e fare clic su Ricerca.

  • Mostra ID: È possibile visualizzare il valore dell'ID sul case selezionato.

  • Nascondi ID: È possibile nascondere il valore dell'ID dal case selezionato.
  • Esporta: L'elenco dei dispositivi viene esportato in formato Excel o PDF.
2È possibile aggiornare l'elenco del case.
3Si visualizza un elenco del case collegato.

Modifica informazioni LED
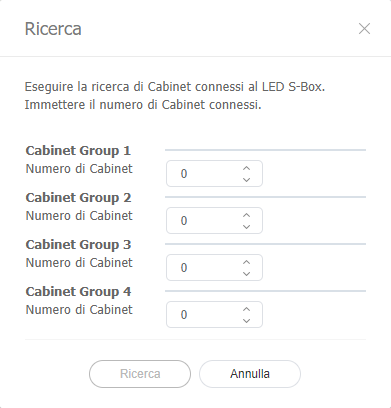
  1. Selezionare il case desiderato dall'elenco dei case e cliccare su Modif.
  2. Visualizzare e modificare le informazioni, quindi cliccare su Salva.
    Per aggiornare lo stato corrente del dispositivo, cliccare su Stato corrente.

    Stylesheet
    classscreen

    Impostazioni Cabinet

    1. ABL: Se il video o l'immagine proiettata è troppo luminosa, potrebbe causare affaticamento agli occhi dopo periodi di tempo prolungati. In tal caso, è possibile impostare una regolazione automatica della luminosità. Per usare questa funzione, cliccare ON. Per disattivarla, cliccare OFF.
    2. Gamma: È possibile cambiare la sorgente di ingresso per il case. Selezionare la sorgente desiderata dalla casella a discesa.
    3. Retroilluminazione: È possibile regolare la luminosità del case al livello desiderato (0 ~ 10 livelli).

    Calibrazione cabinet

    È possibile calibrare la risoluzione del case collegato alle S-box. Per usare questa funzione, cliccare ON. Per disattivarla, cliccare OFF.

    1. Pixel RGB CC: È possibile applicare il valore di regolazione pixel RGB CC alla risoluzione del case.
    2. Modulo RGB CC: È possibile applicare il valore di regolazione modulo RGB CC alla risoluzione del case.
    3. Correzione bordi: È possibile applicare il valore di regolazione dei bordi alla risoluzione del case.

Ricerca case

È possibile cercare il case collegato al dispositivo LED.

  1. Selezionare il case desiderato dall'elenco dei case e cliccare su Esegui scansione Cabinet.
  2. Impostare il numero desiderato per ciascun gruppo e fare clic su Ricerca.

    Stylesheet
    classscreen

Anchor
using_quick_control
using_quick_control
Controllo rapido


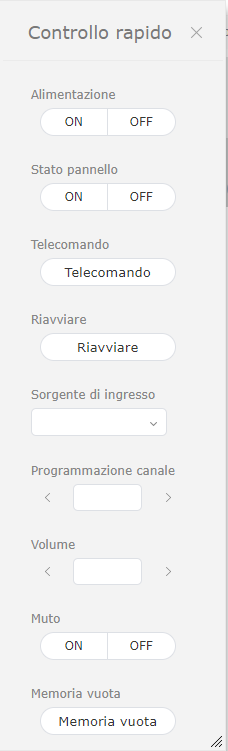
Controllo rapido è la raccolta delle funzioni telecomando utilizzate di frequente per i dispositivi.

Per utilizzare la dashboard Controllo rapido, selezionare i dispositivi dall'elenco e cliccare su Controllo rapido.

Stylesheet
classscreen
AlimentazioneConsente di accendere o spegnere un dispositivo.
Stato pannelloConsente di accendere o spegnere il pannello di un dispositivo.
Telecomando

Consente di abilitare la funzione di connessione remota.

La funzione di accesso remoto è disponibile solamente in MagicInfo Player I.

RiavviareConsente di riavviare un dispositivo.
Sorgente di ingressoConsente di selezionare una sorgente di ingresso dall'elenco a discesa.
Programmazione canaleConsente di modificare un canale dispositivo.
VolumeConsente di regolare il volume di un dispositivo.
MutoConsente di attivare o disattivare l'audio del dispositivo.
Memoria vuotaConsente di svuotare la memoria in un dispositivo.

Anchor
setting_tags_on_devices
Assegnazione di un tag a un dispositivo


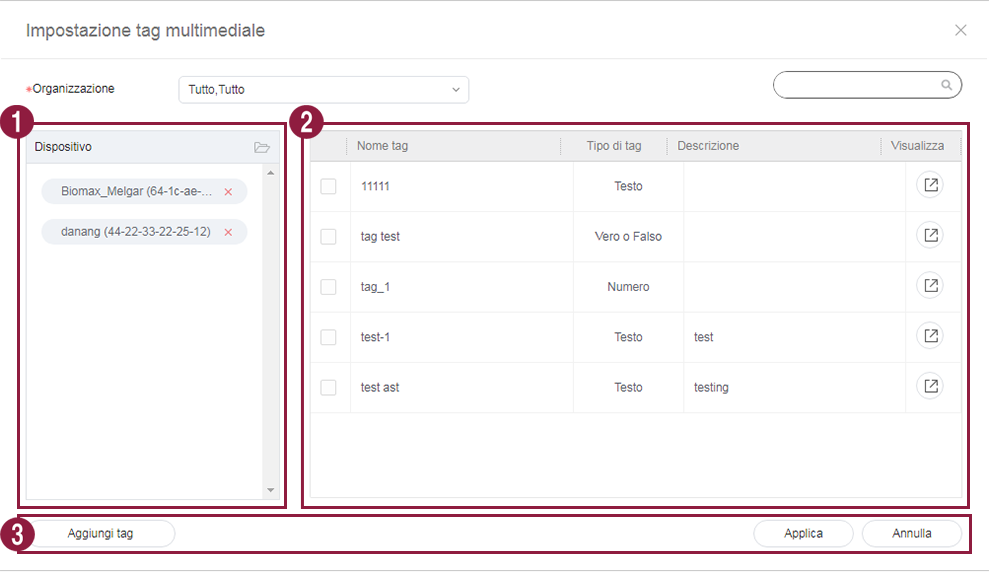
Assegnare un tag a un dispositivo. In tal modo, sul dispositivo verranno visualizzate in maniera selettiva le informazioni che soddisfano le condizioni del tag assegnato a un elemento DLK o a una playlist.

  1. Selezionare un dispositivo dall'elenco dei dispositivi e cliccare su Assegna tag. È possibile selezionare più dispositivi.

    Stylesheet
    classscreen
  2. Utilizzare la finestra di impostazione tag per configurare le impostazioni dei tag e cliccare su Salva.

    Stylesheet
    classscreen
    1I tag vengono visualizzati sotto forma di elenco.
    1. Selezionare un tag e trascinarlo sul dispositivo.
    2. Per aggiungere o eliminare dei tag, cliccare su Modif.
    2

    Consente di visualizzare l'elenco dei dispositivi.

    1. È possibile assegnare qualsiasi tag a ciascun dispositivo.

    2. Per eliminare un tag aggiunto, cliccare su .

    3
    1. Salva: consente di salvare le impostazioni tag.

    2. Chiudi: consente di chiudere la finestra delle impostazioni tag.


Info
titleNota

Per assegnare un tag a un dispositivo, assicurarsi prima di aggiungere il tag a MagicInfo Server. Per ulteriori dettagli sull'aggiunta o modifica di tag, vedere quanto segue. ► 태그 관리하기


...