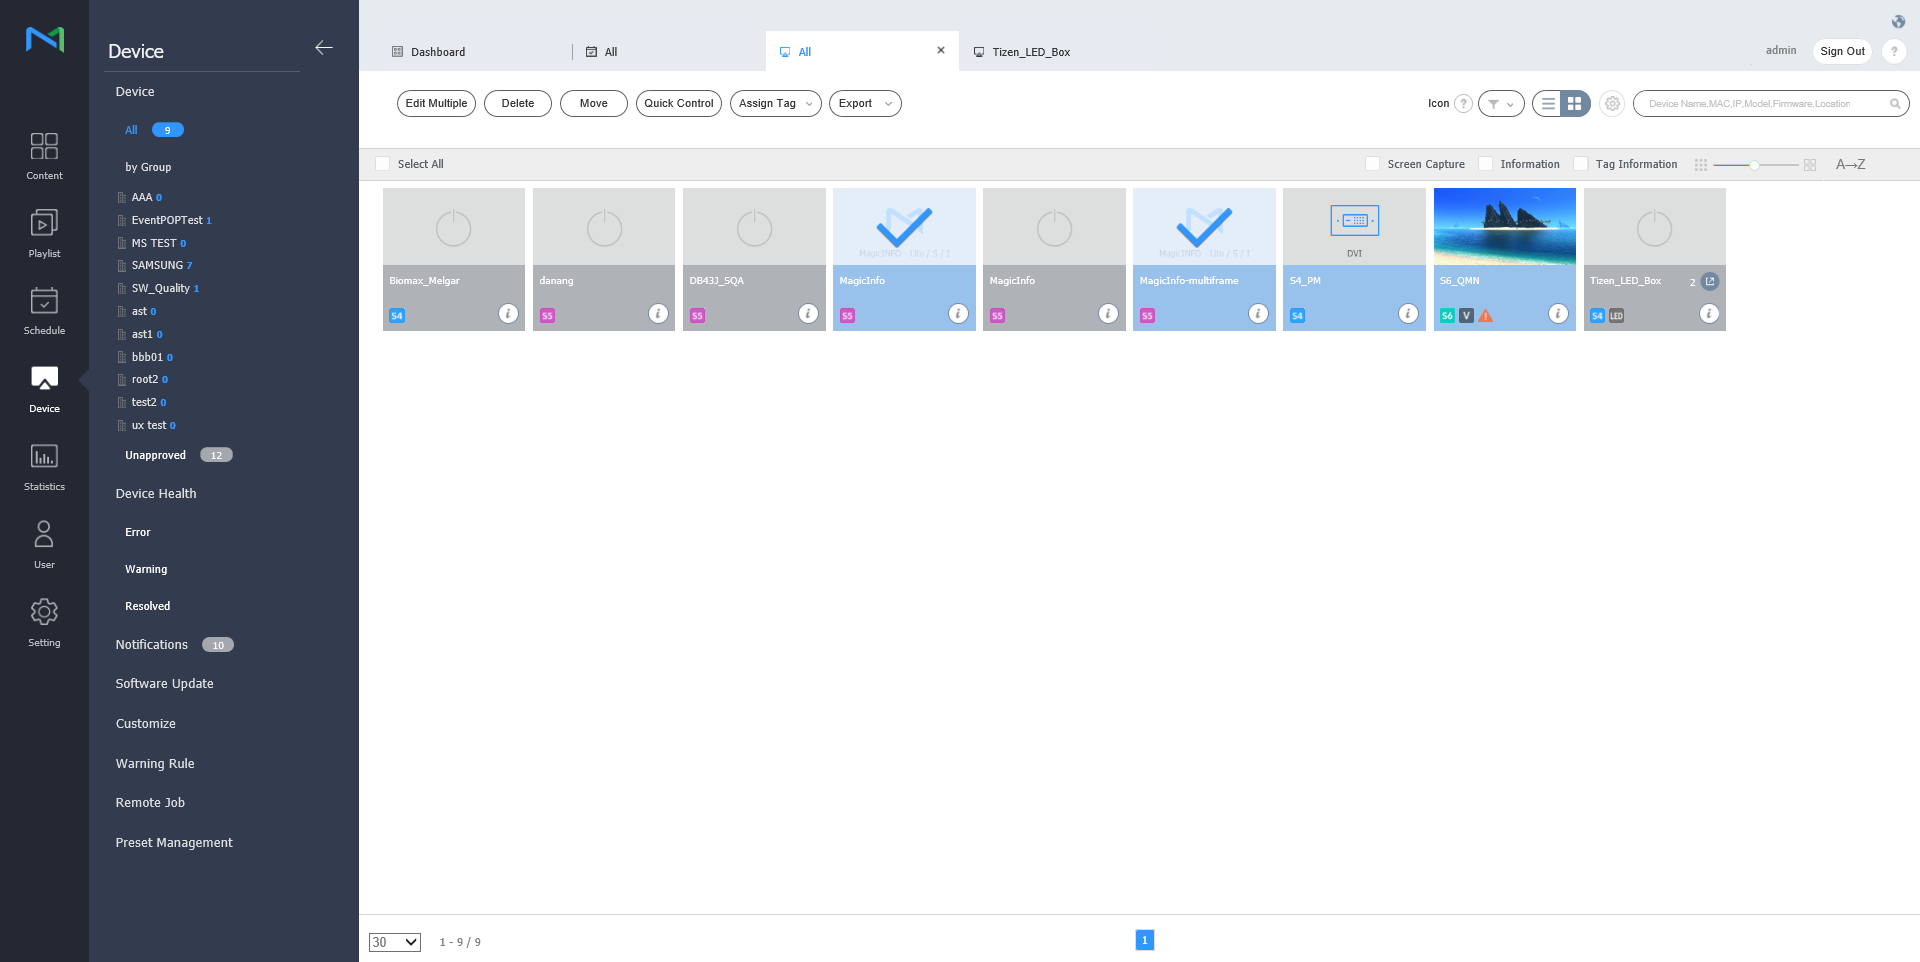
View devices connected to MagicINFO Server, retrieve details for each device, and remotely control devices. Create groups for each organization to manage devices by the group. For each organization, a default group is created by default.
Click Device from the sub-menu items.
- All: View all devices connected to MagicINFO Server, retrieve details for each device, and remotely control devices.
- by Group: View devices connected to MagicINFO Server by the group.
- Unapproved: View and authorize devices that are connected to MagicINFO Server but not authorized.
Note
- If VideoWall devices are connected to MagicINFO Server, click the appropriate menu item view details for each device.
- With Device Permissions enabled, the device manager can only manage devices authorized by general administrator or organization administrators. For details on device management privilege settings, refer to ► Managing user information
| 1 |
|
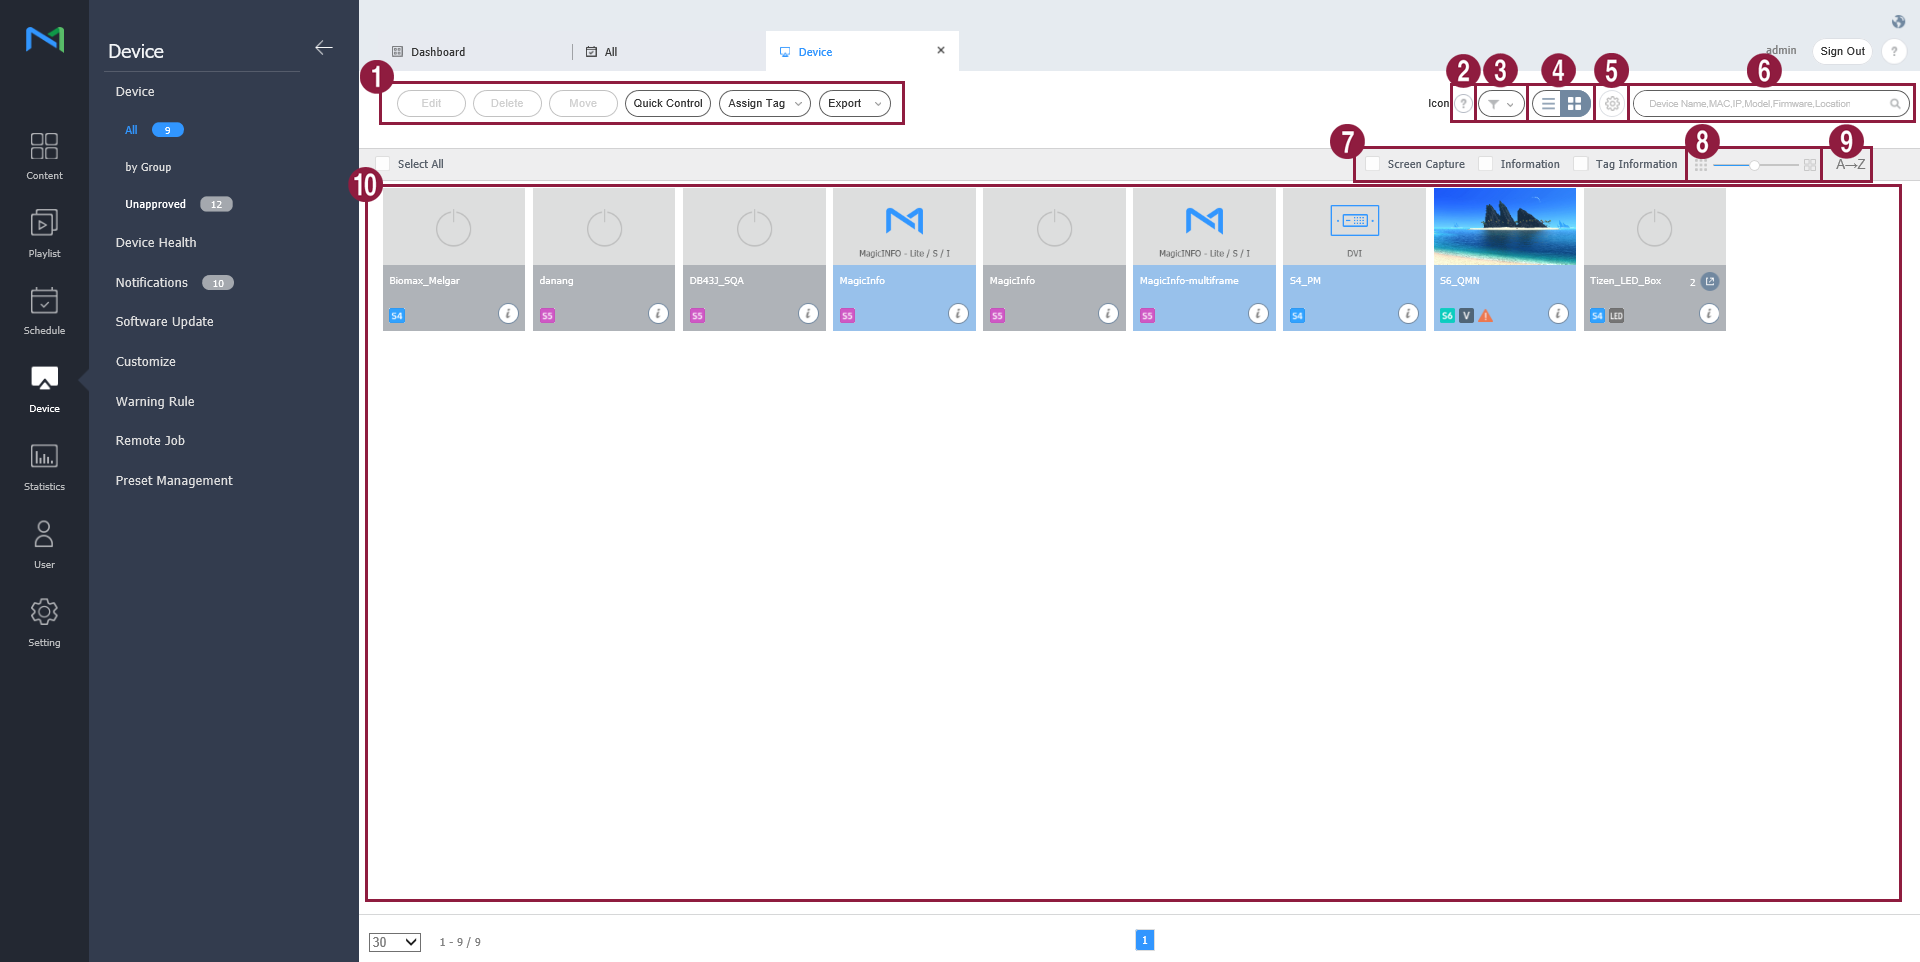
| 2 | View a description of icons displayed on the device list. |
| 3 | Filter the device list to view specific devices only. Select a condition from the filter settings window and click Save. Note If you select Device Type, only devices that currently have licenses registered to MagicINFO Server appear. |
| 4 | Change the view mode for the device list.
|
| 5 | Configure device polling settings. |
| 6 | Search devices by using keywords. |
| 7 | Select info items to display in thumbnails. This option appears only when the device view mode is set to thumbnail mode. |
| 8 | Adjust the size of thumbnails. This option appears only when the device view mode is set to thumbnail mode. |
| 9 | Display the device list in alphabetical or reverse alphabetical order. This option appears only when the device view mode is set to thumbnail mode. |
| 10 | View the list of devices.
|
Authorizing devices
View and authorize devices that are connected to MagicINFO Server but not authorized.
Click Device > Unapproved. Unapproved devices appear.
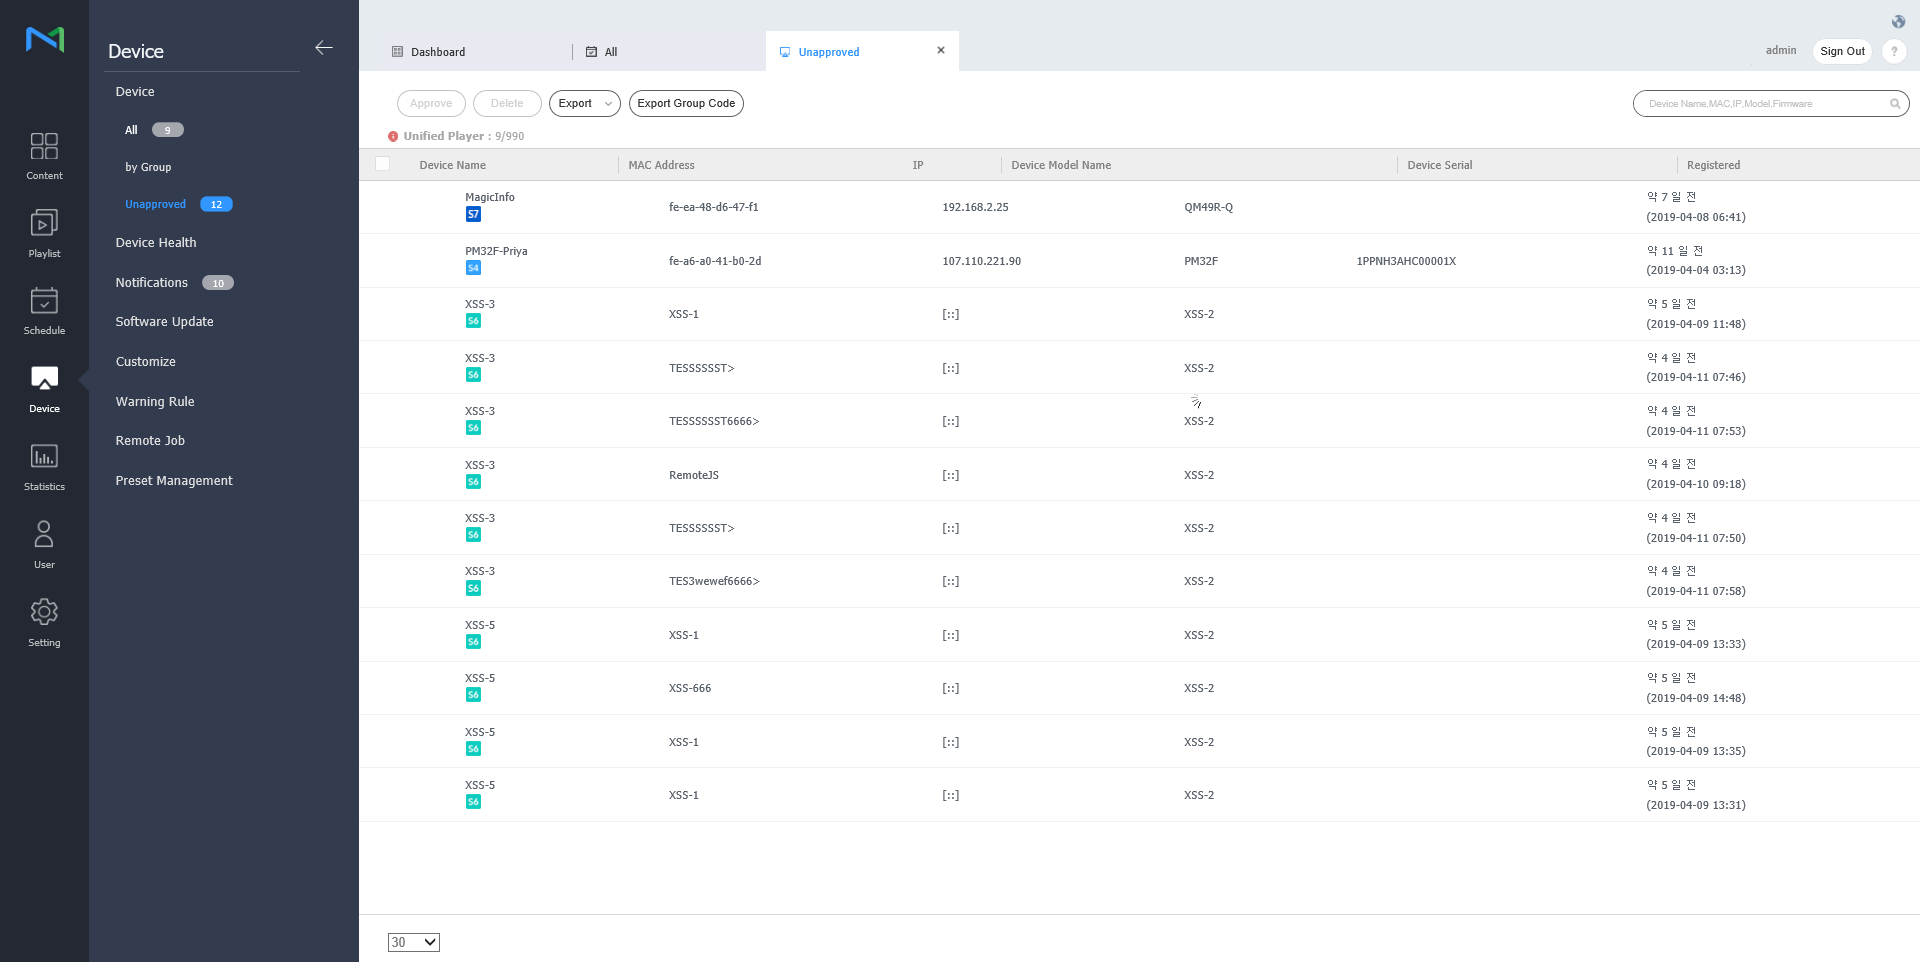
- Select a device and click Approve. A window appears where a device can be authorized.
Specify the name, group, location and expiration date. Click OK. The device has been authorized.

Note
- To delete an unauthorized device without authorizing it, select the device and click Delete.
- To approve multiple devices of the same model simultaneously, select the device checkboxes and click Approve. If you enter representative names of devices, the device names are saved in the "representative name_(sequence number)" format.
Managing device groups
- Click by Group.
- Manage groups, using one of the following options:
- Option 1: Select a group and right-click on the mouse.
- Option 2: Place the mouse cursor on a group name and click
 .
.
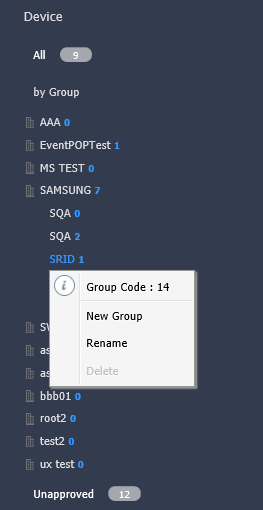
New Group Create a sub-group under the selected group.
Note
A root group can be created by adding an organization. For details on adding organizations, refer to ► Managing organizations
Rename Rename the selected group.
Note
It is not possible to rename a root group.
Delete Delete the selected group.
Note
It is not possible to delete a root group.
Note
- To move a group, drag the group from by Group to a desired location. Sub-groups can be moved to root groups. It is not possible to move root groups to sub-groups. When moving a group that contains sub-groups, all the sub-groups will move together maintaining the group hierarchy.
- The number of users in a group will be displayed next to the group name.
Manage LED device
You can check for the information of LED device that is connected to MagicINFO Server or manage the cabinet that is connected to LED.
Click on ![]() from device list. A list of cabinet that is connected to LED device is displayed.
from device list. A list of cabinet that is connected to LED device is displayed.
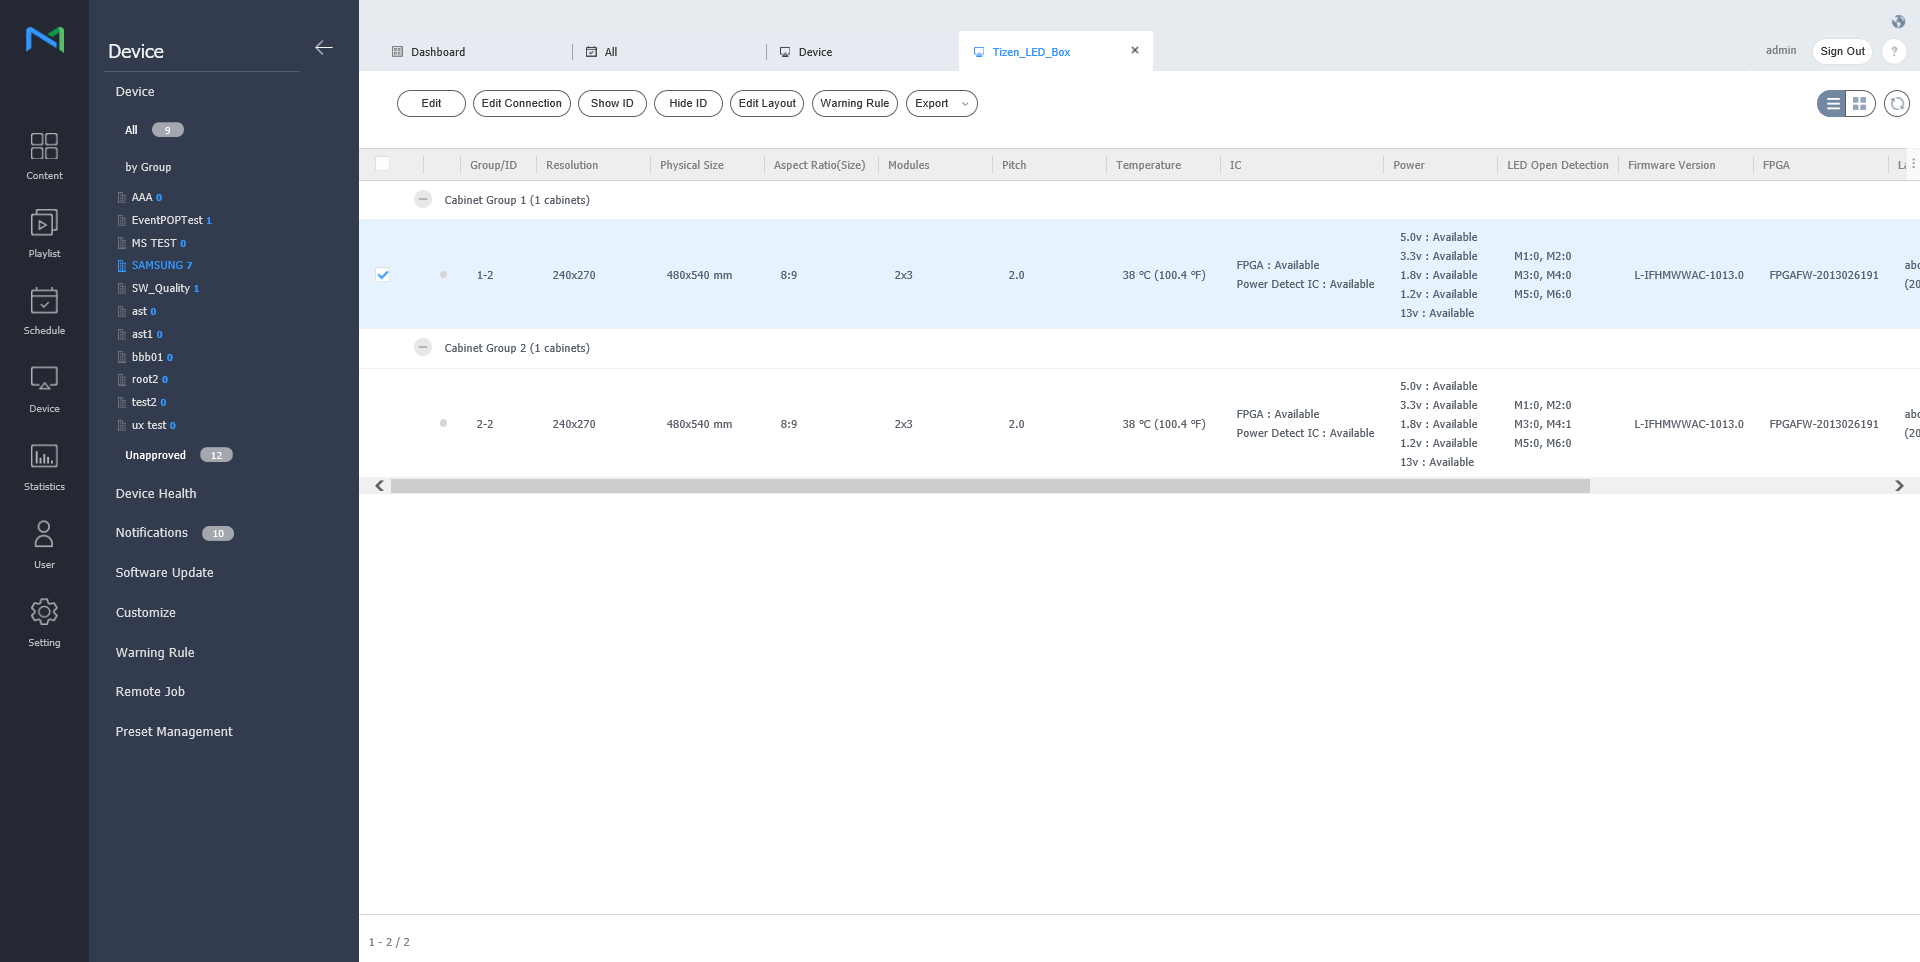
| 1 |
|
| 2 | Change the view mode for the cabinet list.
|
| 3 | You can update the cabinet list. |
| 4 | A list of cabinet that is connected is displayed. |
Modify LED information
- Select the cabinet you wish from cabinet list and click on Edit.
View and edit information and click Save.
To refresh the current device status, click Current Status.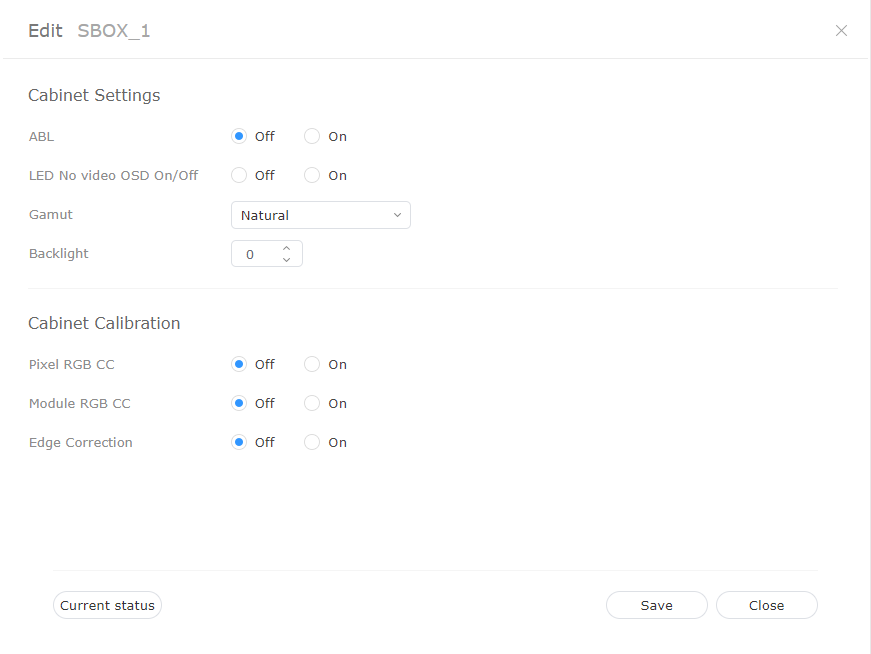
Cabinet Settings
- ABL: If the video or image that is being displayed is too bright, it may cause eye strain after long periods of time. In this case, you can set to automatically adjust the brightness. In order to use the function, click ON. In order to deactivate, click OFF.
- Gamut: You can change the input source for the cabinet. Select the source you desire from a drop down box.
- Backlight: You can adjust the brightness of cabinet at a desired level (0 ~ 10 levels).
Cabinet Calibration
You can calibrate the resolution of cabinet that is connected to S-box. In order to use the function, click ON. In order to deactivate, click OFF.
- Pixel RGB CC: You can apply pixel RGB CC adjustment value as cabinet resolution.
- Module RGB CC: You can apply module RGB CC adjustment value as cabinet resolution.
- Edge Correction: You can apply border adjustment value as cabinet resolution.
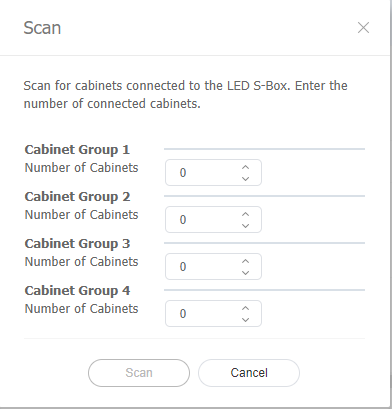
Search cabinet
You can search for the cabinet that is connected to LED device.
- Select the cabinet you wish from cabinet list and click Edit Connection.
Set the desired number for each group and click on Scan.
Configuring cabinet layouts
Use this to configure the layout of Cabinets that are connected to the LED device.
Click Edit Layout in the cabinet list.
- LED Layout Manager will launch.
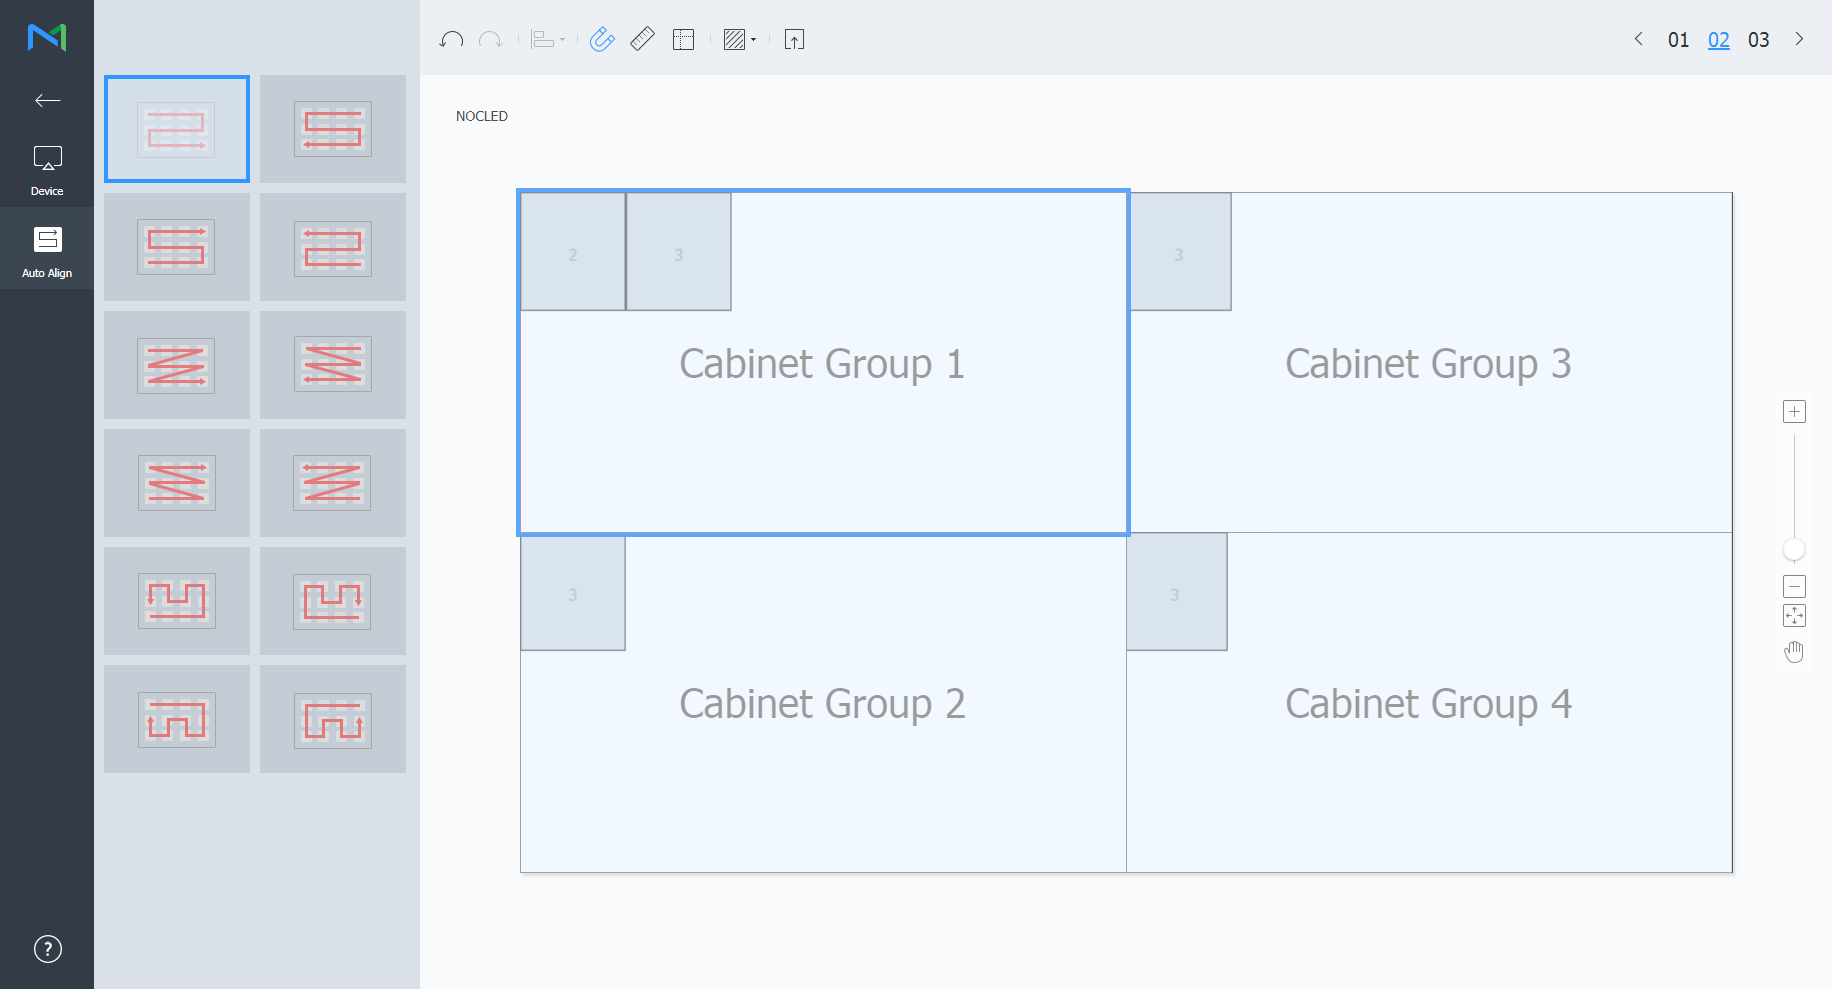
Select from the cabinet groups that belong to the device and click Auto Align.
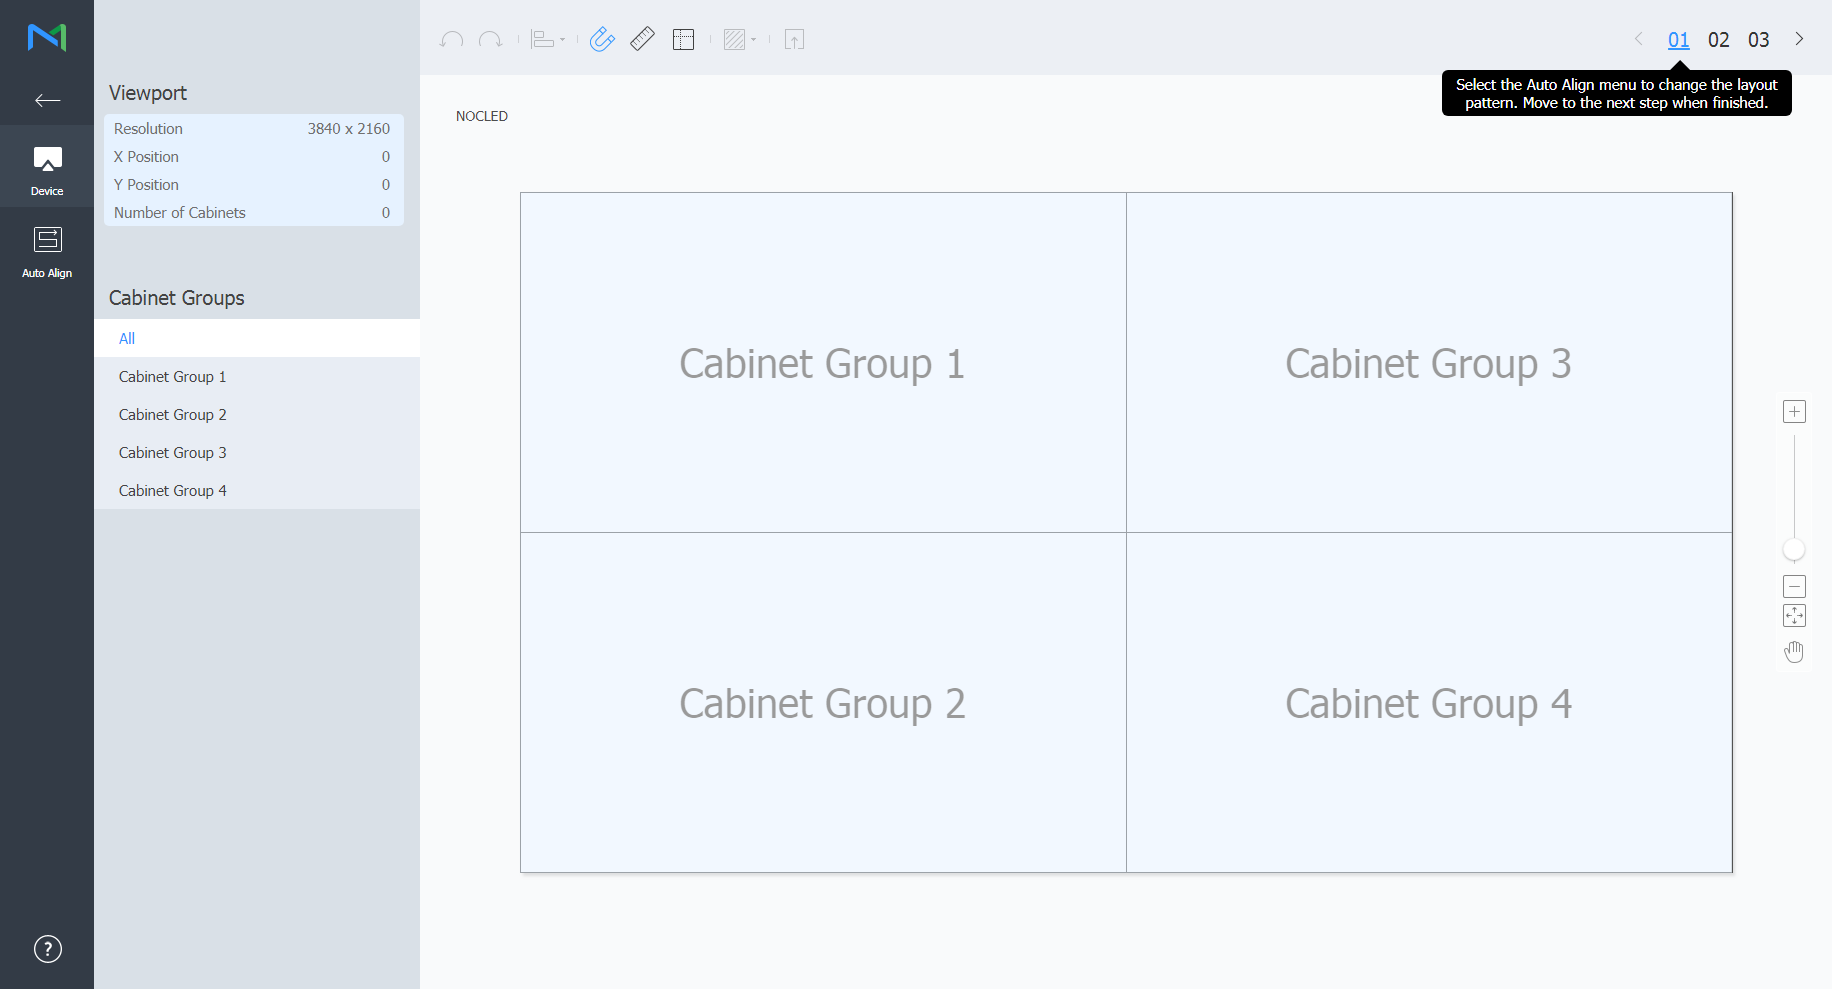
Viewport Review the Viewport resolution and the number of cabinets that are connected to the LED device, along with their position. Cabinet Group Search and select from the list of cabinet groups that are connected to the LED device.
Note
After selecting the group, you can adjust the position of individual cabinets in that group.
- Select a layout file and click 02.
- Click
 to apply a test pattern to the cabinet.
- Click
Adjust the cabinet position and click 03.
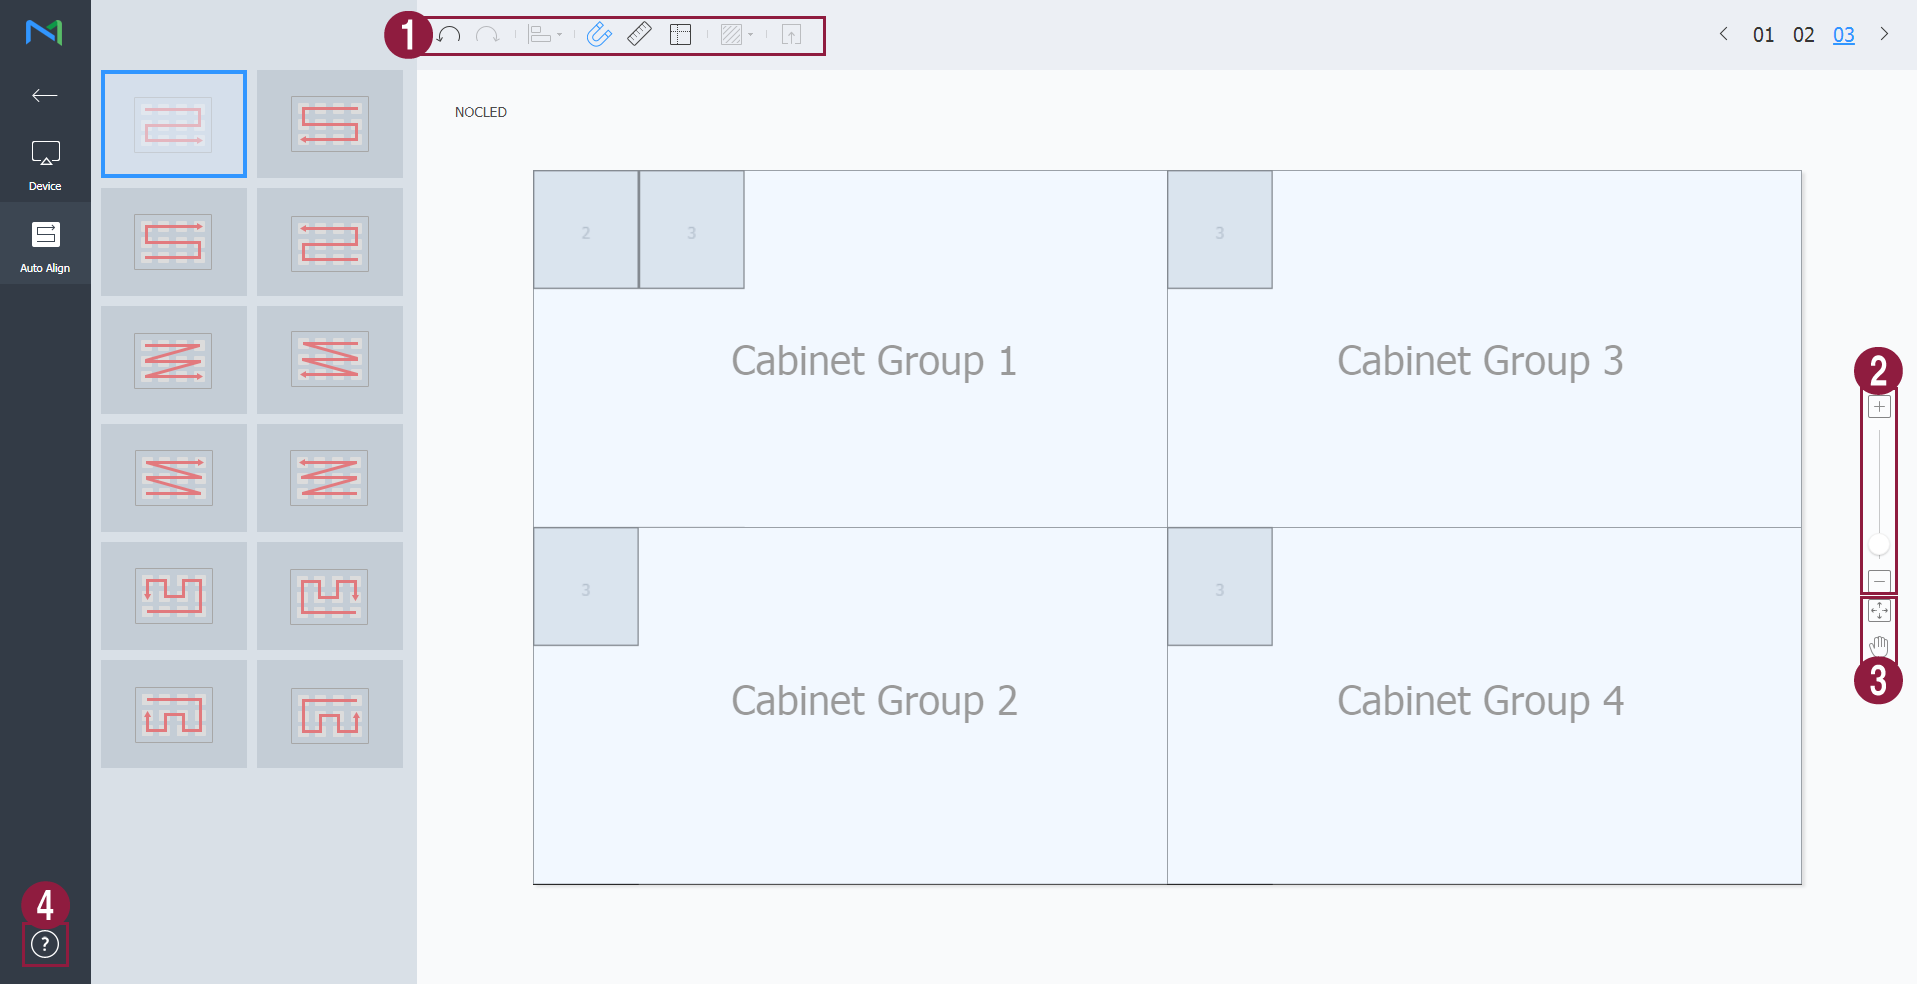
1  : Undo the last command to revert back to the previous state.
 : Redo a command that has been undone.
 : Align several cabinets based on desired alignment criteria.
 : Automatically arrange cabinets to fit the grid.
 : Display the ruler.
 : Display the guides.
- : Select the test pattern to use on the cabinet.
 : Preview the cabinet with the layout applied.
2 Zoom in or out the editor screen view. Use the slide bar to adjust the zoom level.
3  : Adjust the aspect ratio and position of the editor to fit the window for an overview of cabinets.
 : Move the selected cabinet.
4 You can review the Layout Manager version and the open source license information. After editing the layout, click Yes.
- The cabinet layout will be saved to the server.
Quick Control
Quick Control is the collection of frequently used remote device control functions.
To use Quick Control dashboard, select a device from the list and click Quick Control.
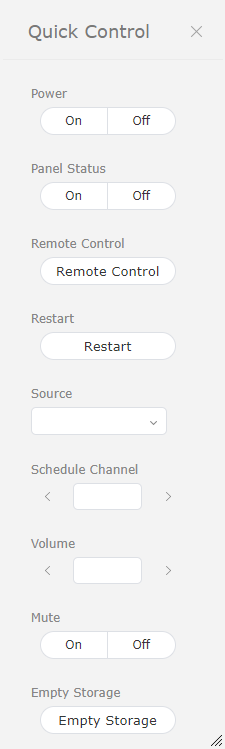
| Power | Turn the device on or off. |
| Panel Status | Switch the device panel on or off. |
| Remote Control | Enable the remote access function. The remote access function is only available in I Player. |
| Restart | Restart the device. |
| Source | Select an input source from the dropdown list. |
| Schedule Channel | Change the device channel. |
| Volume | Adjust the volume of the device. |
| Mute | Mute or unmute the device. |
| Empty Storage | Empty the storage in a device. |
Assigning media tags to devices
Assign a tag to a device. This allows the device to selectively display information that satisfies conditions of the tag assigned to a DLK element or playlist.
Select the checkbox next to devices from the list and and click Assign Tag > Media Tag. It is possible to select more than one device.
Use the media tag settings window to configure media tags and click Save.
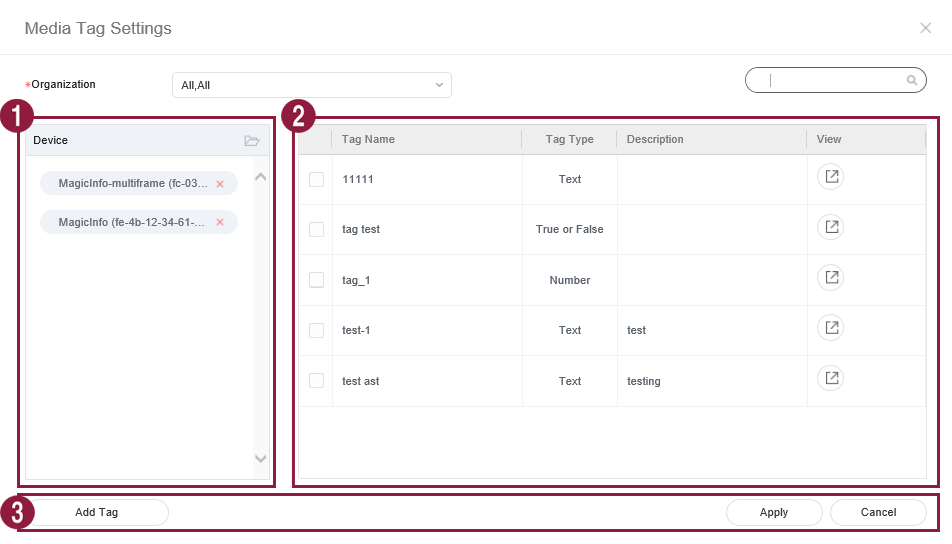
1 View the list of devices.
Add a media tag to individual devices.
Click
 to remove a device from the list.
2 View the list of media tags. - Select the checkbox next to media tags you want to assign.
3 - Add tag: Add media tags.
- Add: Assign selected media tags to devices.
- Cancel: Close the media tag settings window.
Note
To assign a tag to a device, first make sure to add the tag to MagicINFO Server. For details on adding or editing tags, refer to ► Managing tags
Assigning variable tags to devices
Assign variable tags to devices. This allows you to replace other tag values with content-specific variable tags.
- Select the checkbox next to devices from the list and and click Assign Tag > Variable Tag. It is possible to select more than one device.
Use the tag settings window to configure variable tags and click Save.

1 View the list of devices.
Add a variable tag to individual devices.
Click to remove a device from the list.2 View the list of variable tags.
Select the checkbox next to variable tags you want to assign.
To add or delete variable tags, click Edit.3 Add tag: Add variable tags.
Add: Assign selected variable tags to devices.
Cancel: Close the variable tag settings window.
To assign a tag to a device, first make sure to add the variable tag to MagicINFO Server. For details on adding or editing tags, refer to ► Managing tags