Page History
| Sv translation | ||
|---|---|---|
| ||
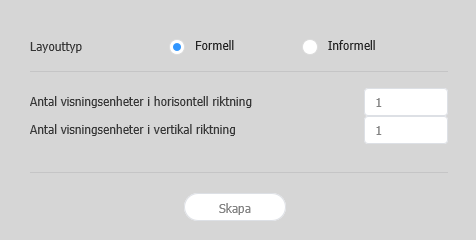
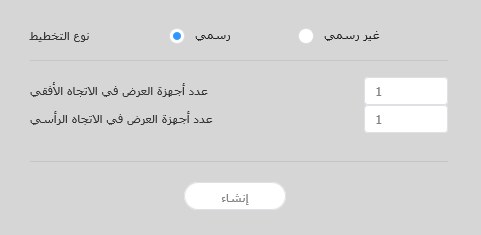
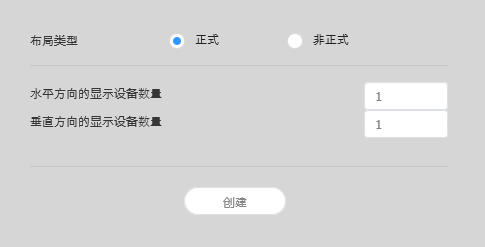
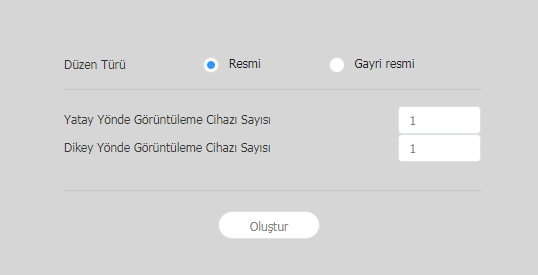
레이아웃 설정하기MagicInfo Server에서 Layout Editor를 실행하면 레이아웃 설정 창이 실행됩니다. 해당 창에서 레이아웃 기본 설정 후 | 비디오월 레이아웃 | 장치 그룹이 모두 같은 모델로 이루어져 있다면 구성할 비디오월 레이아웃 형태를 선택할 수 있습니다.|
| 콘텐츠명 | 새 비디오월 레이아웃의 이름을 입력할 수 있습니다. |
| Stylesheet | ||
|---|---|---|
| ||
|
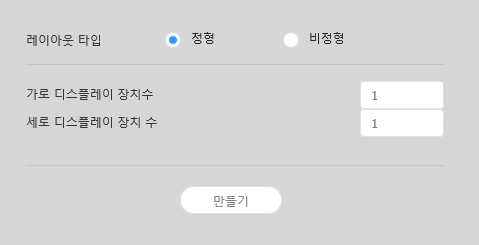
| 레이아웃 타입 |
|
가로 디스플레이
수 비디오월 레이아웃을 구성할 장치의 가로 개수가 표시됩니다. 세로 디스플레이
장치 수 비디오월 레이아웃을 구성할 장치의 세로 개수가 표시됩니다.
레이아웃 구성하기
레이아웃 모드에서 비디오월 레이아웃을 원하는대로 구성할 수 있습니다.
Info title 참고 선택한 레이아웃 타입에 따라 레이아웃 구성 방법이 다릅니다. 이 사용 설명서에서는 비정형을 기준으로 설명합니다.
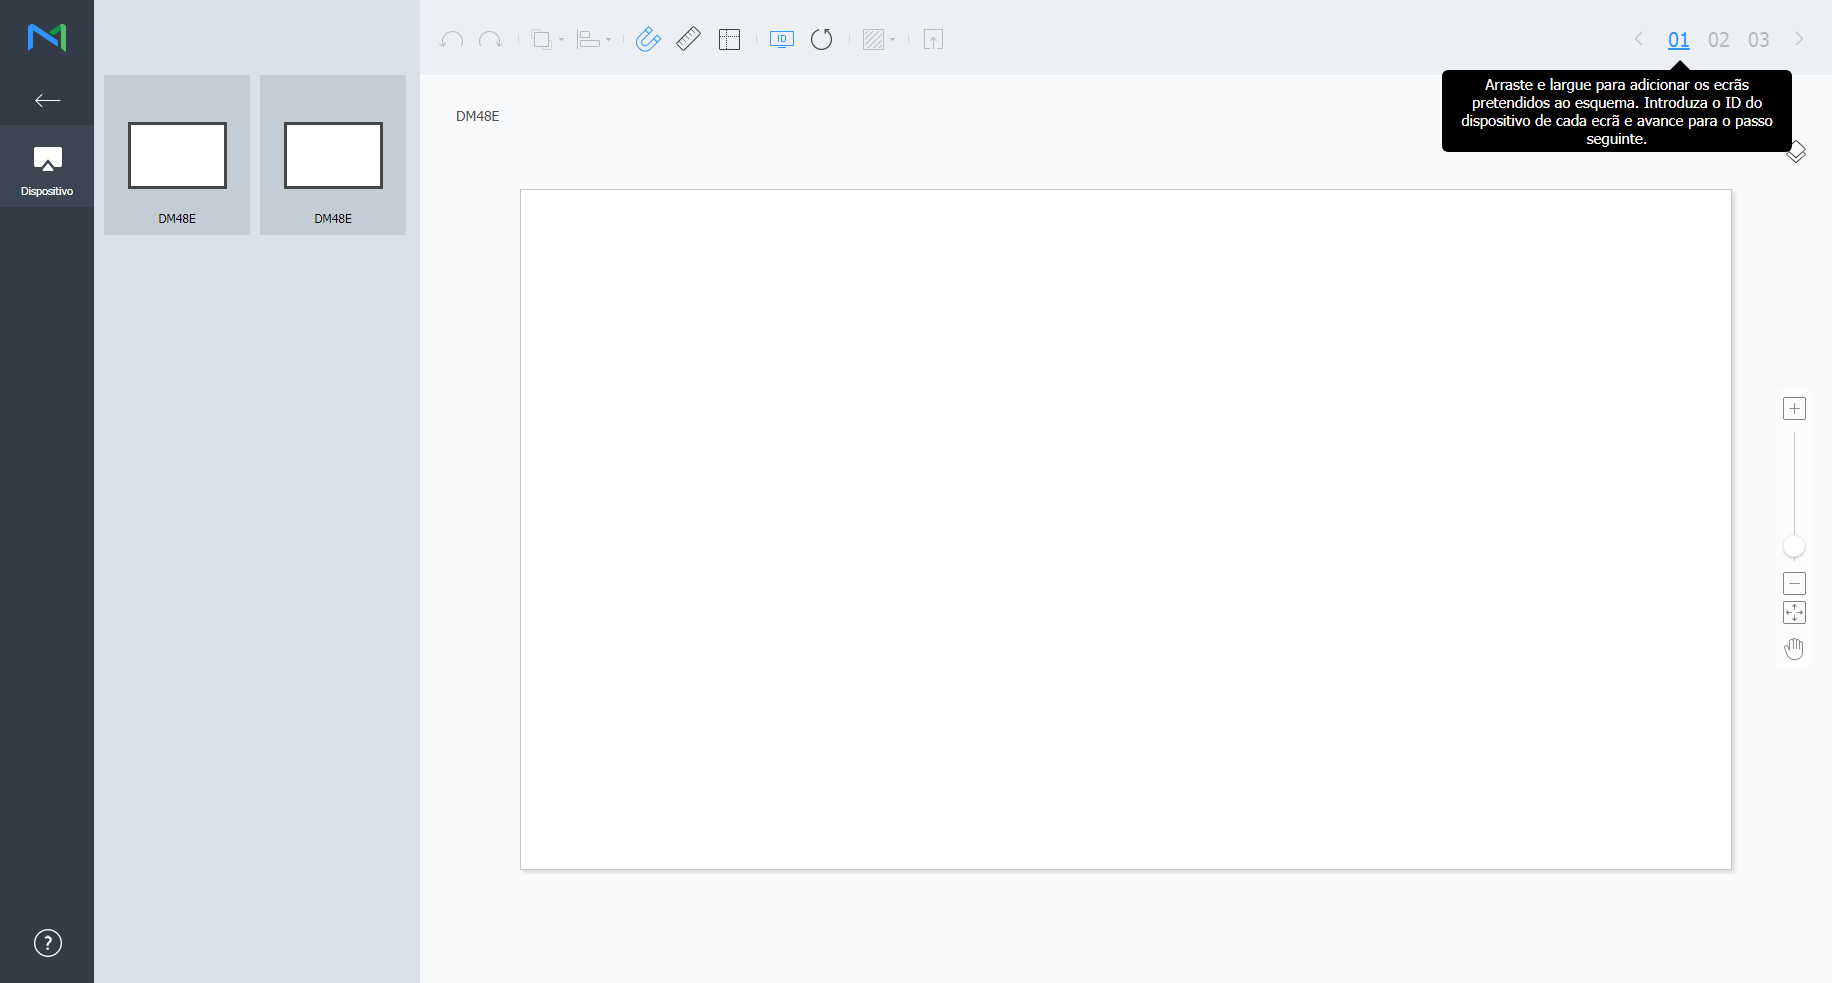
장치 목록에서 원하는 장치를 선택해 편집 영역으로 드래그하세요.
Info title 참고
비디오월 레이아웃이 정형일 때는 미리 설정된 레이아웃 구성을 확인만 할 수 있으며, 편집할 수 없습니다
장치 정렬하기
- 편집 영역에서 원하는 장치를 선택하세요.
- 원하는 방법을 선택해 장치를 정렬하세요.
- 방법 1: 메뉴 바의 편집 > 정렬을 클릭한 후 원하는 정렬 기준을 선택하세요.
- 방법 2: 편집 영역의 장치를 마우스 오른쪽 버튼으로 클릭하면 나타나는 메뉴에서 정렬을 선택한 후 정렬 기준을 지정하세요.
- 방법 3: 도구 모음에서 원하는 정렬 아이콘(
 )을 클릭하세요.
장치 배치하기
- 편집 영역에서 원하는 장치를 선택하세요.
- 원하는 방법을 선택해 장치를 배치하세요.
- 방법 1: 메뉴 바의 편집 > 순서 변경을 클릭한 후 원하는 배치 순서를 선택하세요.
- 방법 2: 편집 영역의 장치를 마우스 오른쪽 버튼으로 클릭하면 나타나는 메뉴에서 순서를 선택한 후 배치 순서를 지정하세요.
- 방법 3: 도구 모음에서 원하는 배치순서 아이콘(
 )을 클릭하세요.
섹션 속성 설정하기
| Info | ||
|---|---|---|
| ||
Layout Editor에서는 같은 장치 그룹의 모든 장치를 하나의 섹션으로 인식합니다. |
편집 영역에서 섹션을 선택하세요.
| Info | ||
|---|---|---|
| ||
편집 영역 중 가상 장치 화면 이외의 빈 영역을 선택한 상태에서 장치를 클릭하면 섹션이 선택됩니다. |
속성 탭에 섹션 상세 정보가 나타나면 섹션의 위치 정보(회전 각도)를 원하는 대로 설정하세요.
X 위치, Y 위치: 섹션의 가로, 세로 위치가 표시됩니다.
| Info | ||
|---|---|---|
| ||
X, Y 위치 값은 확인만 가능하며, 수정할 수 없습니다. |
회전 각도: 섹션의 배치 각도를 설정할 수 있습니다. 스크롤 바를 좌우로 드래그해 원하는 각도를 설정하세요.
| Info | ||
|---|---|---|
| ||
다음과 같은 방법으로도 회전 각도를 지정할 수 있습니다.
|

장치 속성 설정하기
속성 탭에 선택한 장치의 상세 정보가 나타나면 장치 위치 정보를 원하는 대로 설정하세요.
디스플레이 장치 정보는 확인만 가능하며, 수정할 수 없습니다.
- 모델명: 장치의 모델명이 표시됩니다.
- 가로 해상도: 장치의 가로 해상도 값이 표시됩니다.
- 세로 해상도: 장치의 세로 해상도 값이 표시됩니다.
- 가로 크기: 장치의 너비를 표시합니다.
- 패널 수평 크기: 장치에서 베젤의 좌우 두께를 제외한 가로 크기가 표시됩니다.
- 베젤 좌우 두께: 장치의 좌우 베젤 두께가 표시됩니다.
- 세로 크기: 장치의 높이를 표시합니다.
- 패널 수직 크기: 장치에서 베젤의 상하 두께를 제외한 세로 크기가 표시됩니다.
- 베젤 상하 두께: 장치의 상하 베젤 두께가 표시됩니다.
장치의 위치 정보를 설정할 수 있습니다.
회전 각도: 장치의 배치 각도를 설정할 수 있습니다. 스크롤 바를 좌우로 드래그해 원하는 각도를 설정하세요.
| Info | ||
|---|---|---|
| ||
다음과 같은 방법으로도 회전 각도를 지정할 수 있습니다.
|
네 번째 Y위치: 장치 아래쪽 왼편의 세로 위치를 설정할 수 있습니다.
| Info |
|---|
장치의 위치는 편집 영역에서 장치를 선택한 후 원하는 위치로 드래그하여 설정할 수도 있습니다. |
장치 맵핑하기
레이아웃 모드에서 설정이 완료되면 맵핑 모드를 클릭하세요.
맵핑 모드에 진입하면 실제 장치 화면에 ID가 나타납니다. 이 ID를 사용하여 편집 영역의 가상 장치와 실제 장치를 연동할 수 있습니다.
| Info | ||
|---|---|---|
| ||
장치 ID는 해당 장치 그룹에 속한 장치 개수에 따라 부여됩니다. 예를 들어, 장치 그룹에 모두 10개의 장치가 있다면 각 장치에는 01~10 까지의 ID가 나타납니다. |
- 편집 영역에서 원하는 장치를 선택하세요.
- 속성 탭에 선택한 장치의 상세 정보가 나타나면 실제 장치에서 확인한 ID를 입력하세요.
편집 영역의 해당 장치 화면에 입력한 ID가 표시됩니다.
| Info | ||
|---|---|---|
| ||
|
레이아웃 미세 조정하기
맵핑 모드에서 설정이 완료되면 미세조정 모드를 클릭하세요.
실제 장치의 위치 설정에 미세한 조정이 필요한 경우 미세조정 모드를 사용하여 간편하게 수정할 수 있습니다.
| Info | ||
|---|---|---|
| ||
|
- 편집 영역에서 원하는 요소(섹션 또는 장치)를 선택하세요.
- 속성 탭에 선택한 요소의 상세 정보가 나타나면 위치 값을 수정하세요.
- 도구 모음에서
 클릭하세요.
변경 사항이 적용됩니다.
| Info | ||
|---|---|---|
| ||
|
MagicInfo Server에 배포하기
비디오월 레이아웃 구성이 완료되면 작업 완료를 클릭하세요.
| Info |
|---|
맵핑 모드에서 장치 ID 설정을 완료해야 작업 완료 단계를 사용할 수 있습니다. |
구성한 비디오월 레이아웃이 MagicInfo Server로 배포되며, 해당 장치 그룹에 적용됩니다.
| language | en |
|---|
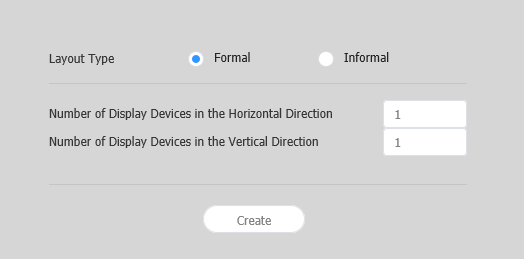
Layout settings
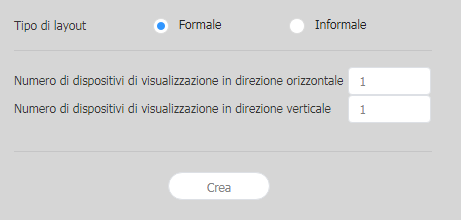
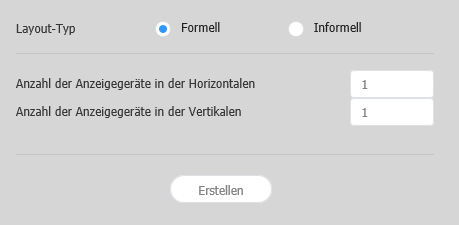
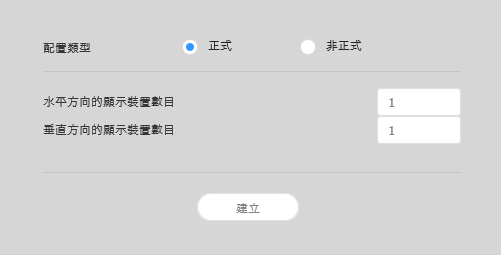
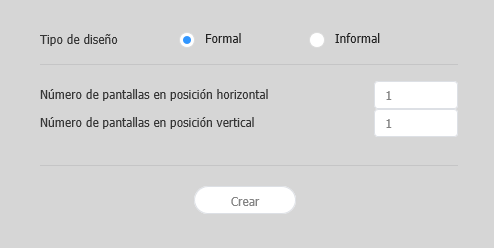
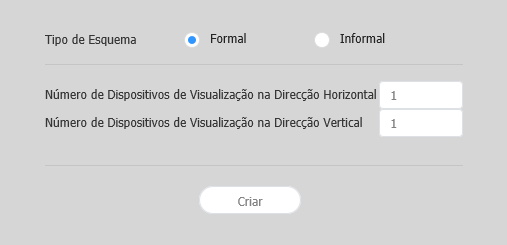
If you launch Layout Editor from MagicInfo Server, the Layout setting window appears. Configure basic layout settings from the window, and then click Create.
- A videowall layout is created in the edit section, and layout mode activates.
- Using a previously created videowall layout will start Layout Mode without displaying the Layout setting window.
Select a videowall layout. This option is available when the device group consists of devices of the same model.
- Formal: Arrange devices in formal mode using a predefined matrix such as 2x2 and 3x4.
- Irregular: Customize the arrangement of devices to suit your preferences.
레이아웃 타입을 정형으로 선택한 경우 이 과정이 생략됩니다.
Stylesheet class screen 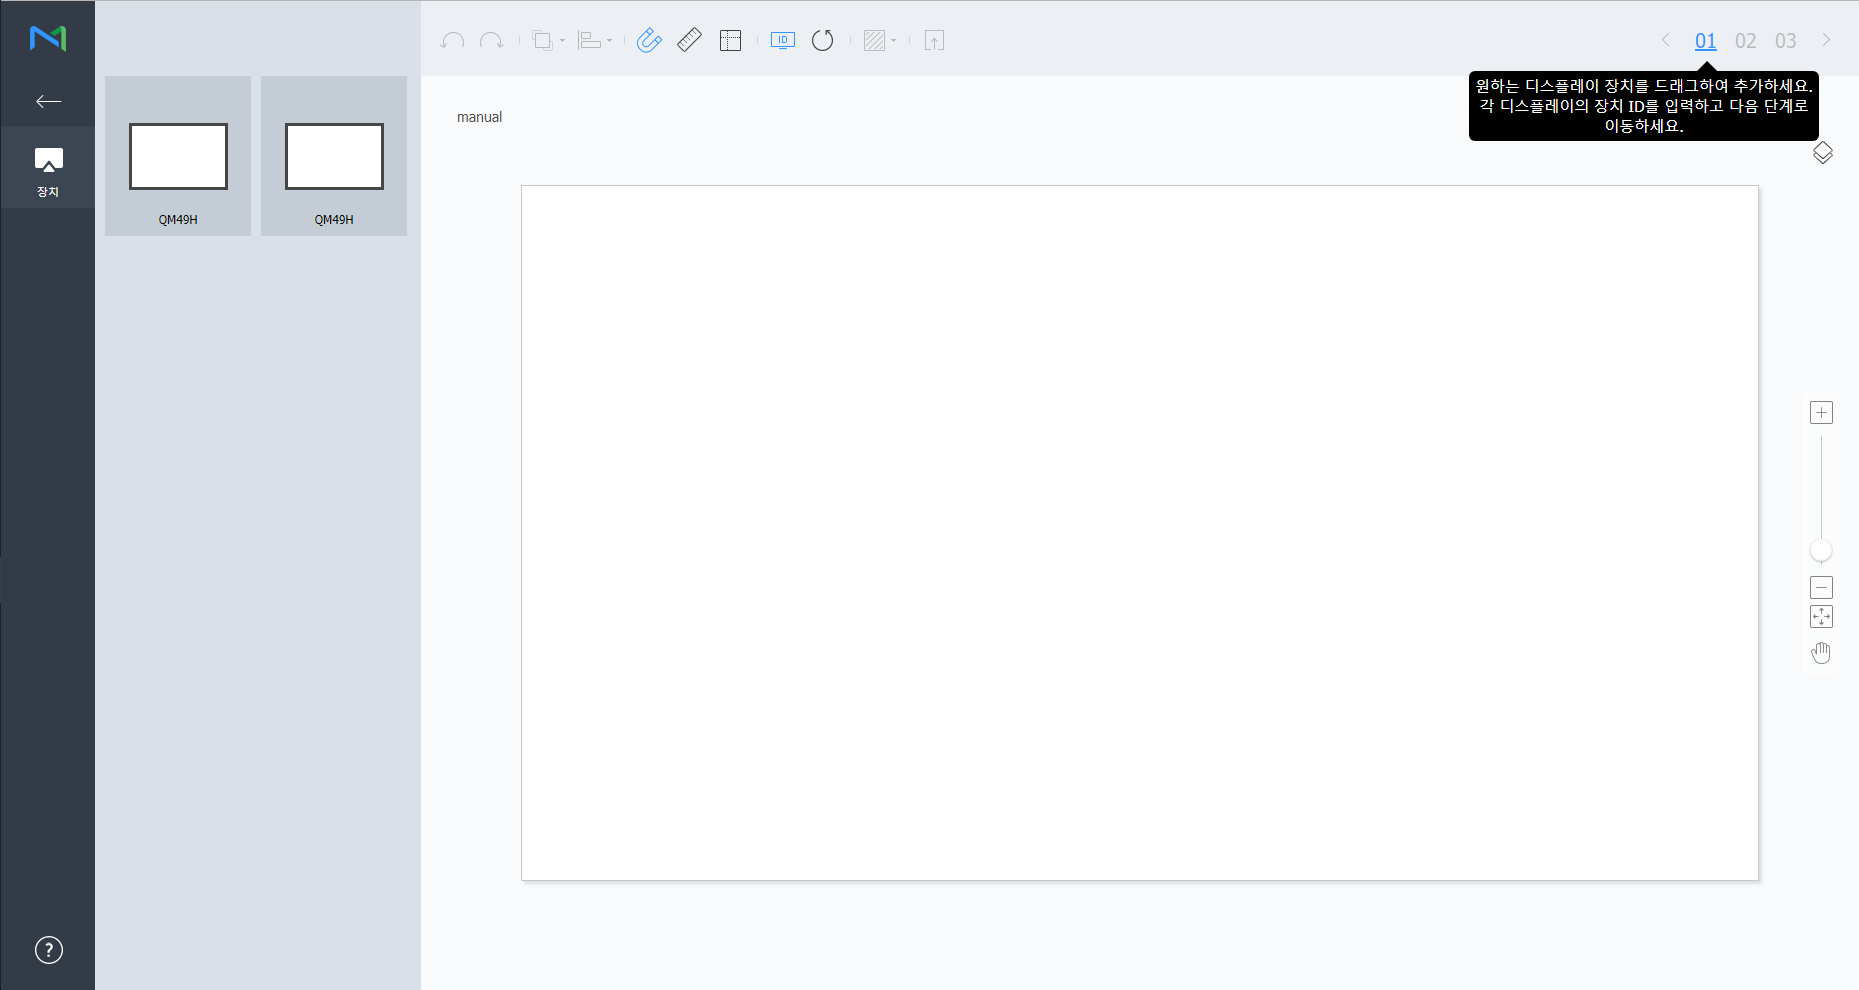
각 장치에 장치 ID를 입력한 후 02를 클릭하세요.
Stylesheet class screen 
1 입력한 장치 ID를 장치 화면에 표시할 수 있습니다. 2 입력한 장치 ID를 초기화할 수 있습니다. 장치의 세부 위치를 조절한 후 03을 클릭하세요.
Stylesheet class screen 
1  : 마지막에 실행한 작업을 취소하여 이전 상태로 되돌릴 수 있습니다.
 : 실행 취소한 작업을 다시 실행할 수 있습니다.
 : 여러 개의 장치들을 원하는 정렬 기준에 맞게 한번에 정렬할 수 있습니다.
 : 장치가 눈금에 자동으로 맞춰 정렬됩니다.
 : 눈금자를 표시합니다.
 : 안내선을 표시합니다.
 : 장치에 표시할 테스트용 패턴을 선택할 수 있습니다.
 : 적용된 레이아웃을 장치에서 미리 볼 수 있습니다.
2 장치의 위치를 미세하게 조절할 수 있습니다. 3 편집 화면의 보기 비율을 확대/축소할 수 있습니다. 슬라이드 바를 조절해 원하는 비율로 설정하세요. 4  : 편집 화면의 비율과 위치를 창 사이즈에 맞게 조정하여 장치를 한눈에 확인할 수 있습니다.
 : 선택된 장치를 이동할 수 있습니다.
5 VWL Layout Editor의 버전 및 오픈 소스 라이선스를 확인할 수 있습니다. - 레이아웃 구성이 끝나면 예를 클릭하세요.
- 해당 비디오월 레이아웃이 서버에 저장됩니다.
| Sv translation | ||||||||||||||||||||||||||||||||||||||||||||||||||
|---|---|---|---|---|---|---|---|---|---|---|---|---|---|---|---|---|---|---|---|---|---|---|---|---|---|---|---|---|---|---|---|---|---|---|---|---|---|---|---|---|---|---|---|---|---|---|---|---|---|---|
| ||||||||||||||||||||||||||||||||||||||||||||||||||
|


| Sv translation | |||||||||||||||||||||||||||||||||||||
|---|---|---|---|---|---|---|---|---|---|---|---|---|---|---|---|---|---|---|---|---|---|---|---|---|---|---|---|---|---|---|---|---|---|---|---|---|---|
| |||||||||||||||||||||||||||||||||||||
Ustawienia układuPo uruchomieniu Layout Editor z MagicInfo Server wyświetla się okno ustawień Layout (Układ). Skonfiguruj w oknie podstawowe ustawienia układu, a następnie kliknij Create (Utwórz).
The number of vertical devices in a videowall layout is shown. | Configuring a layoutConfigure a videowall layout as desired using Layout Mode.
Aligning devices
Arranging devices
Configuring section properties
Select a section from the edit section.
When detailed section information appears in the Properties tab, change information about the section location (rotation angle) as desired. | Location |

| Info | ||
|---|---|---|
| ||
X and Y values are read only and cannot be edited. |
Rotation: Specify the arrangement angle for a section. Drag the scroll bar left or right to specify the angle.
| Info | ||
|---|---|---|
| ||
Alternative ways to specify the rotation angle are as follows:
|
Configuring device properties
When detailed information about the selected device appears in the Properties tab, configure information about the device location as desired.
Display device information is read only and cannot be edited.
- Model Name: A device model name is shown.
- Horizontal Resolution: The horizontal resolution for a device is shown.
- Vertical Resolution: The vertical resolution for a device is shown.
- Width: View the device width.
- Panel Horizontal Size: Device width is shown. The bezel thickness is excluded from the width.
- Bezel Top to Bottom Thickness: The bezel thickness on the left and right edges of a device is shown.
- Height: Device height is shown.
- Panel Vertical Size: View the device height with the bezel width excluded.
- Bezel Left to Right Thickness: The bezel thickness on the top and bottom of a device is shown.
Configure information about a device location.
Rotation: Specify the arrangement angle for a device. Drag the scroll bar left or right to specify the angle.
| Info | ||
|---|---|---|
| ||
Alternative ways to specify the rotation angle are as follows:
|
Fourth Y Position: Specify the vertical location for the bottom left of a device.
| Info |
|---|
A device location can also be configured by dragging the device to a desired location in the edit section. |
Mapping devices
After configuring the required settings in Layout Mode, click Mapping Mode.
An ID appears on the actual device screen as soon as Mapping Mode activates. Use the ID to control the virtual device screen in the edit section in conjunction with the actual device.
| Info | ||
|---|---|---|
| ||
Device IDs are assigned according to the number of devices that form a device group. For example, if a device group has ten devices, different IDs are displayed on each device in the range 01–10. |
- Select a device from the edit section.
- When detailed information about the selected device appears in the Properties tab, enter the ID found on the actual device.
The ID will be displayed on the device screen in the edit section.
| Info | ||
|---|---|---|
| ||
|
Finely adjusting layouts
After configuring the required settings in Mapping Mode, click Finetuning Mode.
To finely adjust location settings for an actual device, use Finetuning Mode to edit the settings.
| Info | ||
|---|---|---|
| ||
|
- Select an element (section or device) from the edit section.
- When detailed information about the selected element appears in the Properties tab, edit the location value.
- Click on the toolbar.
Changes will be applied.
| Info | ||
|---|---|---|
| ||
|
Deploying to MagicInfo Server
After configuring a videowall layout, click Complete.
| Info |
|---|
Complete step is only available after a device ID is set in Mapping Mode. |
The VideoWall layout you configured will be deployed to MagicInfo Server and applied to selected device group(s).
Horizontal Direction (Liczba urządzeń w pionie) | Wyświetlana jest liczba urządzeń układu videowall w pionie. |
Konfiguracja układu
Konfiguracja żądanego układu videowall z wykorzystaniem Layout Mode (Tryb układu).
Uwaga:
- W trybie formalnego układu videowall zdefiniowany wstępnie układ jest tylko do odczytu i nie można go edytować.
Dopasowanie urządzeń
- Wybierz urządzenie z sekcji edycji.
- Dopasuj urządzenia wykorzystując jedną z opcji:
- Opcja 1: Kliknij Edit (Edytuj) > Sort (Sortuj) na pasku menu, a następnie wybierz tryb dopasowania.
- Opcja 2: Prawym przyciskiem kliknij na urządzenie w sekcji edycji i wybierz Sort (Sortuj). Następnie wskaż tryb dopasowania.
- Opcja 3: Kliknij żądaną ikonę dopasowania (
 ) na pasku narzędzi.
Porządkowanie urządzeń
- Wybierz urządzenie z sekcji edycji.
- Rozmieść urządzenia wykorzystując jedną z opcji:
- Opcja 1: Kliknij Edit (Edytuj) > Sort (Sortuj) na pasku menu, a następnie wybierz tryb porządkowania.
- Opcja 2: Prawym przyciskiem kliknij na urządzenie w sekcji edycji i wybierz Order (Porządkuj). Następnie wskaż tryb porządkowania.
- Opcja 3: Kliknij żądaną ikonę porządkowania (
 ) na pasku narzędzi.
Konfiguracja właściwości sekcji
Uwaga:
- W Layout Editor urządzenia w grupie urządzeń traktowane są jako jedna sekcja.
- Wybierz sekcję z sekcji edycji.
Uwaga:
- Aby wybrać sekcję kliknij puste pole (inne niż ekran urządzenia wirtualnego) w sekcji edycji, a następnie kliknij urządzenie.
- Kiedy w zakładce Properties (Właściwości) wyświetlą się szczegółowe informacje o sekcji, zmień informacje o lokalizacji sekcji (kąt obrotu).
- Kiedy w zakładce Properties (Właściwości) wyświetlą się szczegółowe informacje o sekcji, zmień informacje o lokalizacji sekcji (kąt obrotu).
Location (Lokalizacja) |
Uwaga Wartości X i Y są tylko do odczytu i nie można ich edytować.
Uwaga: Kąt obrotu można również określić w następujący sposób:
|


Konfiguracja właściwości urządzeń
- Wybierz urządzenie z sekcji edycji.
- Kiedy w zakładce Properties (Właściwości) wyświetlą się szczegółowe informacje o wybranym urządzeniu, skonfiguruj informacje o lokalizacji urządzenia.
Display Device (Urządzenie wyświetlające) | Informacje o urządzeniu wyświetlającym są tylko do odczytu i nie można ich edytować.
Height (Wysokość): Wyświetla się wysokość urządzenia.
|
Location (Lokalizacja) | Konfiguracja informacji o lokalizacji urządzenia. Center position X (Położenie środkowe X): Określ lokalizację w poziomie dla środka urządzenia. Podaj wartość lokalizacji. Lokalizacja urządzenia zmieni się. Center position Y (Położenie środkowe Y): Określ lokalizację w pionie dla środka urządzenia. Podaj wartość lokalizacji. Lokalizacja urządzenia zmieni się. Rotation (Obrót): Wskaż kąt orientacji urządzenia. Przeciągnij pasek przewijania w lewo lub prawo, by określić kąt. Uwaga Kąt obrotu można również określić/ustawić w następujący sposób:
First X Position (Położenie pierwsze X): Określ lokalizację w poziomie dla lewego górnego rogu urządzenia. First Y Position (Położenie pierwsze Y): Określ lokalizację w pionie dla lewego górnego rogu urządzenia. Second X Position (Położenie drugie X): Określ lokalizację w poziomie dla prawego górnego rogu urządzenia. Second Y Position (Położenie drugie Y): Określ lokalizację w pionie dla prawego górnego rogu urządzenia. Third X Position (Położenie trzecie X): Określ lokalizację w poziomie dla prawego dolnego rogu urządzenia. Third Y Position (Położenie trzecie Y): Określ lokalizację w pionie dla prawego dolnego rogu urządzenia. Fourth X Position (Położenie czwarte X): Określ lokalizację w poziomie dla lewego dolnego rogu urządzenia. Fourth Y Position (Położenie czwarte Y): Określ lokalizację w pionie dla lewego dolnego rogu urządzenia. Lokalizację urządzenia można także skonfigurować przeciągając urządzenie do żądanej lokalizacji w sekcji edytowania. |


Mapowanie urządzeń
Po konfiguracji wymaganych ustawień w Layout Mode (Tryb układu) kliknij Mapping Mode (Tryb mapowania).
Natychmiast po aktywacji Mapping Mode (Trybu mapowania) na ekranie urządzenia wyświetlane jest ID, które służy do sterowania ekranem wirtualnego urządzenia w sekcji edycji łącznie z urządzeniem.
Uwaga:
- Identyfikatory urządzeń są przypisywane na podstawie liczby urządzeń, które tworzą grupę. Na przykład jeżeli grupa obejmuje dziesięć urządzeń, na każdym urządzeniu wyświetlane są inne ID w przedziale od 01 do 10.
- Wybierz urządzenie z sekcji edycji.
- Kiedy w zakładce Properties (Właściwości) wyświetlą się szczegółowe informacje o wybranym urządzeniu, podaj ID wyświetlane na urządzeniu.
ID będzie wyświetlane na ekranie urządzenia w sekcji edycji.
Uwaga
- Aby wyświetlić lub ukryć ID urządzenia na ekranie urządzenia, kliknij
 /
/  na pasku narzędzi.
 - Aby zresetować ID przypisane do urządzenia w sekcji edycji kliknij
 na pasku narzędzi.
Dostrajanie układów
Po konfiguracji wymaganych ustawień w Mapping Mode (Tryb mapowania) kliknij Finetuning Mode (Tryb dostrajania).
Trybu Finetuning Mode (Tryb dostrajania) używa się do dostrojenia ustawień lokalizacji urządzenia.
Uwaga
- Finetuning Mode (Tryb dostrajania) dostępny jest dopiero po ustawieniu ID urządzenia w Mapping Mode (Trybie mapowania).
- Finetuning Mode (Tryb dostrajania) to krok opcjonalny. Można go pominąć.
- W Finetuning Mode (Tryb dostrajania) można dostroić układ videowall, nawet jeżeli układ jest w trybie formalnym.
- Wybierz element (sekcja lub urządzenie) z ekranu edycji.
- Kiedy w zakładce Properties (Właściwości) wyświetlą się szczegółowe informacje o wybranym elemencie, edytuj wartość lokalizacji.
- Kliknij
 na pasku narzędzi.
Zmiany zostaną zastosowane.
Uwaga
- Na ekranie fizycznego urządzenia pojawia się wzór, dzięki któremu można precyzyjnie dostroić układ. Aby wyświetlić lub ukryć ten wzór na ekranie urządzenia, kliknij
 /
/  na pasku narzędzi.
 - Aby zmienić ten wzór na ekranie urządzenia kliknij
 .
.
Wysyłanie do MagicInfo Server
- Po konfiguracji układu videowall kliknij Complete (Zakończ).
Complete (Zakończ) jako krok jest dostępne dopiero po ustawieniu ID urządzenia w Mapping Mode (Tryb mapowania). - Po wyświetleniu prośby o potwierdzenie wysyłki układu VideoWall do MagicInfo Server kliknij Yes (Tak).
Skonfigurowany układ VideoWall zostanie wysłany do MagicInfo Server i zastosowany wobec wybranej grupy (lub grup) urządzeń.
| Sv translation | ||||||||||||||||||||||||||||||||||||||||||||||||||
|---|---|---|---|---|---|---|---|---|---|---|---|---|---|---|---|---|---|---|---|---|---|---|---|---|---|---|---|---|---|---|---|---|---|---|---|---|---|---|---|---|---|---|---|---|---|---|---|---|---|---|
| ||||||||||||||||||||||||||||||||||||||||||||||||||
|